Showing posts with label staging. Show all posts

Wednesday, August 18, 2021

Explaining Staging

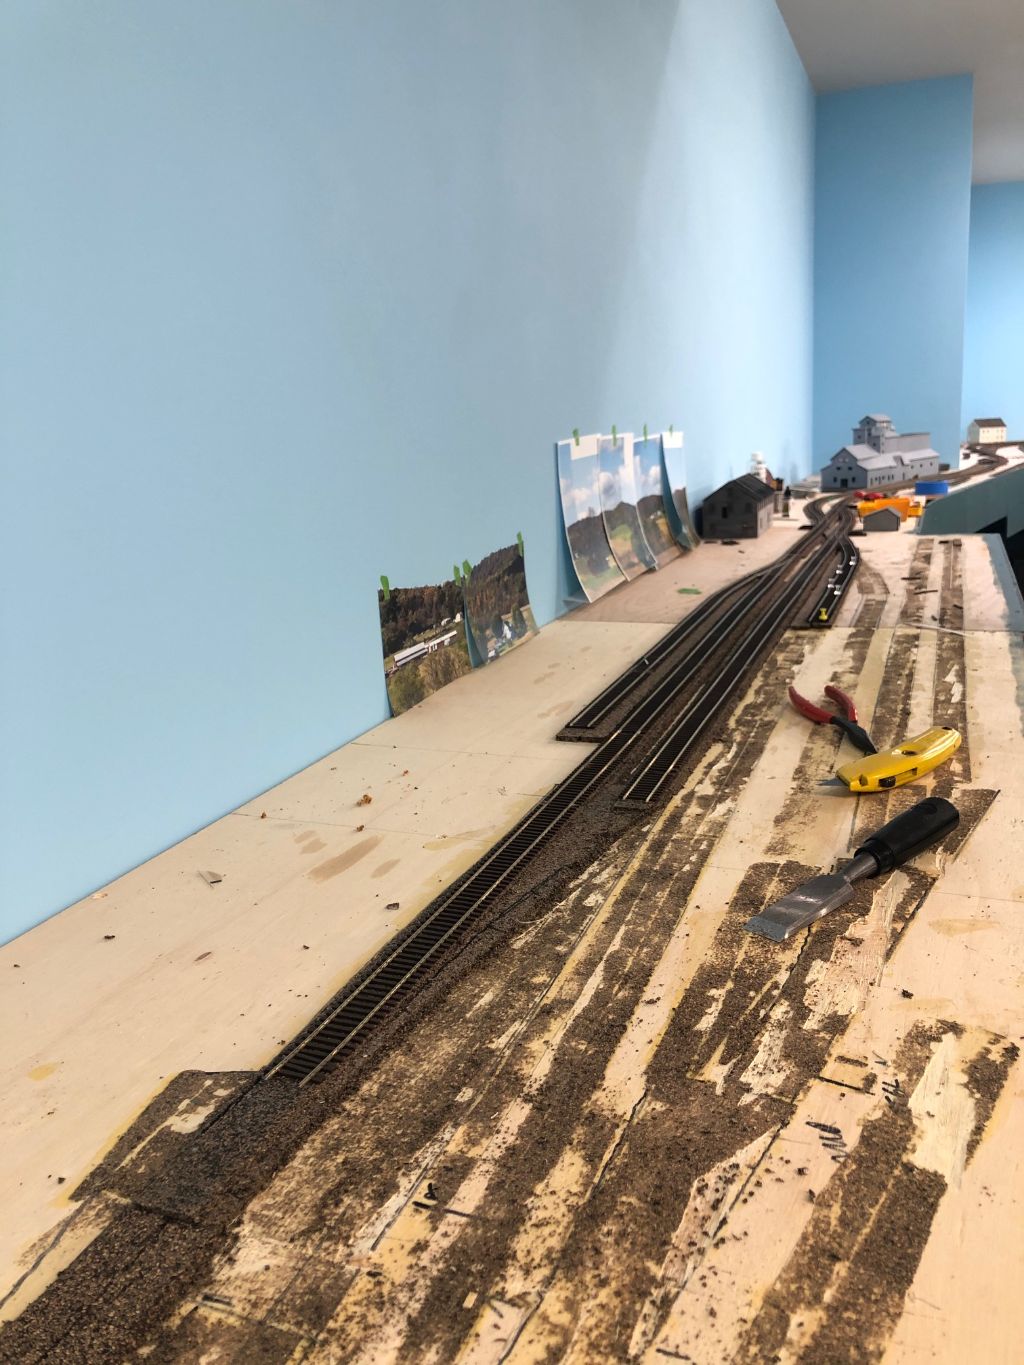
Over the last few evenings I've completed the basic landforms for the area where trains will emerge from the staging tracks onto the scenicked portion of the layout. As mentioned previously, the staging tracks aren't hidden from view (since hidden from view in this case would also mean "difficult to access"!). They will, however, be screened from view by a low rise in the ground, and perhaps trees and bushes. At the point where the staging tracks emerge from hiding trains will round a bend and appear from behind a more dense stand of trees. At least that's the plan. We'll see how effective it is in practice. 

Some questions and comments indicate a little bit of confusion with what exactly is going on in this corner of the layout. Really, it may seem complicated or confusing but when you see it in person it makes perfect sense. 

I will try to clear this up with a couple of labeled photos. 

A few months back I described how I added a couple of new staging tracks to the layout. There are actually two stub-ended "screened" tracks along the right hand (short) wall if you view the track plan in the Richford Branch layout description tab above. 

These represent the originating point of the Richford Branch in St. Albans, Vermont. These are labeled St. Albans (west) in the image above. As you can see in the photo above there are two other double-ended siding tracks visible in the foreground. These tracks serve a dual purpose. First of all, their primary function is to represent the interchange connection with the CPR in Richford at the other end of the branch. But since these two tracks are double-ended they could also provide additional "surge" staging capacity for another train originating in St. Albans. And their third, and perhaps most important function, at least to me, is to provide a continuous run connection. 

The second photo shows the other end of the staging yard. This is the point where trains coming from St. Albans will first appear "on scene." This photo also shows the other end of those double ended Richford CPR interchange tracks. I've built up the basic landforms out of foam board and florist foam to create a scene with a slight slope to the foreground between the track and aisle and a slight hillside between the track and wall. I'm hoping this will prove to be a good place for "roster shots" of rolling stock. 

Since all this "staging" is really integrated into the rest of the layout visually my intention is to scenic it, ballast the track, etc... 

To the casual observer it will just look like a few more tracks - perhaps with a train or cut of cars spotted on it - but won't be a visually jarring distraction from the rest of the layout. 

Hope that clears things up!

Tuesday, August 10, 2021

More backdrops

 Work continues on the basic scenery landforms around the staging yard. I managed to slice my finger pretty good with a box cutter - I attempted to slice a section of foam off a block while steadying it with my other hand - and let's just say that put a damper on any further progress that evening!

I've also managed to complete painting the initial base coat of the background hills along the long wall of the basement. 

Now that my finger is no longer throbbing I should be able to add the highlights to the backdrop trees. 

Here's a couple of photos showing some sections of the backdrop - sorry, no photos of the finger... 


Wednesday, April 7, 2021

Doubling Staging Capacity

One advantage of modeling a one-train-a-day branch is that solo operation is no problem. Sure, I'd love to have two- or three-person crews, but until enough folks get vaccinated (happy to report I got my first vaccine a couple of weeks ago!) solo sessions aren't going away anytime soon!

My staging consisted of exactly one track for St. Albans and one track for the CP in Richford!). About 10 days ago I noticed  everything - and I mean everything - was derailing as it came out of the St. Albans track.  

I'd had some noticeable rail kinks in one or two spots on the layout a few weeks ago - likely due to the rather sudden change in temperature and humidity. Most of these were easily fixed but in the case of this particular track something about the temperature and humidity shift, and/or the track itself, caused the rail to actually separate from the ties in the meat of a curve. 

Even before it became my version of a monorail, I'd noticed  issues with the brass 2-8-0s on this curve. As they went through the curve the top of the extended tender coal bunker would just touch the edge of the cab roof causing the locomotive to short. 

Since I had to relay the track anyway I opted to increase the radius of the curve. I even found I could add a Peco curved turnout and add another staging track - doubling the storage/display capacity of my yard. 
This hill, built in somewhat of a rush prior to an open house, never really looked right to me. 

I'd never liked how the hardshell hill at the other end of the staging track had come out. When I built it - just before our Christmas 2019 open house - I didn't brace it sufficiently so the whole thing kind of sagged in all sorts of odd ways. 

One thing that made this spot a little problematic was access to the wall switch that controls the room lights. I didn't want the switch plate to be visible, so I added a opening in the fascia that I can reach into to turn the lights on and off. To prevent another sagging hillside incident I constructed a Gatorboard former cut to the rough outline of the hillside with a hole cut to clear the light switch. A box from a couple of pieces of Gatorboard was added to make the recessed area look a little cleaner and to stop the hill from dropping down. 

The new hill under construction, with the Gatorboard former against the wall. (The two staging tracks are visible center left against the wall).  

The hillside is made from strips of foamboard cut to rough dimensions, glued in place vertically and side to side, and then formed to the final shape. That hill is basically solid so it isn't going anywhere anytime soon. The very top surface is florist foam to facilitate installing trees. 

Next step will be to fill in some of the gaps in the hillside, paint, and add ground texture and foliage. 

Tuesday, February 18, 2020

One step back, Three Steps Forward (?)


Somehow this was all supposed to be
the CV yard in St. Albans, the
interchange with the CPR in Richford,
and the CPR Yard, also in Richford.
I'm not going to try to explain how all
that worked since I'm not entirely sure!
It's tempting to include additional elements into a model railroad - especially in the drawing lines on paper stage. After all, lines are skinny and don't have volume meaning they're easy to cram into place. And model railroaders sometimes seem pre-wired to think if they're not filling every available square inch with something, they're somehow squandering the railroad's potential. 
Let's focus for a minute on that most model railroady of all model railroady things, staging. 
For those who might not know what staging is, the concept is quite simple. Since we don't have room to model an entire railroad, or even portion of a railroad in our basement, the Ancient Ones devised the concept of "staging" - which most often takes the form of a large number of parallel tracks representing "everywhere else." Think of it as similar to "backstage" at a play - after all when Sir Whomever announces "I'm off to see the Queen in Paris" and walks off the stage we don't believe he actually went to France. We know that he's backstage having a smoke sitting on a pile of old sets and the like - but we accept this as part of the story telling. Staging yards on model railroad aren't much different. 
At some point in the hobby's history we somehow intertwined "satisfying layout" with staging yards - and to be a "real" model railroader, or to have a satisfying layout, you had to have staging. And if some staging is good, more must be better - with two or more staging yards equating to some sort of model railroad nirvana. 
You'll frequently read an article or blog post from some model railroaders who apologize for their inadequacies in the staging realm. 
"You can never have enough staging;" 
"Take the amount of staging you have, double it and then add one!" are frequent chants of this crowd.
Perhaps for some layouts these statements are true. They aren't true for me. 
When Lance Mindheim designed my Richford Branch, he included a small three-track staging yard along one long wall. (You can see the plan HERE). Lance drew a 12" wide shelf for the staging yard, but when I measured the basement - before the interior walls or even the staircase was installed - I was off by a foot - meaning the room is a foot wider than shown in the plan. Naturally the intelligent thing to do would have been to build the benchwork according to Lance's plan and have a foot extra in the aisle, but space abhors a vaccum, and I've been accused of a lot of things, but prudence isn't one of them, so I built a 24" wide shelf. 
The Richford Branch starts in St. Albans and ends at an interchange with the Canadian Pacific in Richford. I came up with a scheme where the same staging yard (now more than twice the number of tracks that Lance designed, after all I had the space . . .) would serve as both ends of the railroad.  Yes, I built the staging yard (see above). I also addressed the temptation of this whole scenario in  a previous blog post (HERE). 
While hunting around for some photos of any of the towns along the Richford Branch, I came across this image of the creamery in East Berkshire, Vt. I like how the building is set into a hill, and I especially liked the large sign on the exterior wall. I also dug up a track map of East Berkshire (from Nimke's books). 
A remarkably simple scene - a double ended siding, and a couple of spurs. At first I tried to cram it in somewhere on the existing layout, but for once the "simpler is better" motto won out and I avoided the temptation. Then I figured I could add the creamery to another one of the modeled towns on the layout, but I'd always know it really belonged in East Berkshire. 

Then it dawned on me, other than some sort of acknowledgement of conventional wisdom, and "state of the art" layout design, why do I need a staging yard on the layout at all? This is, after all, a one-train-a-day branch. 
At some point during this process I happened to re-read Randy Anderson's article on his Huntington & Broad Top that appeared in an early issue of Model Railroad Planning.  I'd asked Lance include the small three-track staging yard in order to provide some variety in consists - I do like freight cars - but my excess cars can be stored off layout in drawers or boxes. 
Through all this I was having trouble picturing what would end up looking like a big blank "spot" along a large, highly visible portion of the layout. Even a scenicked staging yard, perpetually filled with cars, would seem contrary to the feeling of a branchline. 
The solution seemed obvious. Replace the staging yard with a new town based on East Berkshire. A single staging track was all that's needed to hold the branchline local before it starts it's run. Frankly, I don't even need that. 
You can see the vestiges of the old staging
 yard tracks on the left. The spur with
the pushpins is the team track. 
Long time readers of this blog will recall I spent years doing, then redoing things on my last layout. I'm really trying to avoid a similar waste of time and resources this time around. In this case, a step back might permit me to take one or more steps forward. 
In any event, the recently concluded long weekend was put to good use as a I removed the staging yard and started installing East Berkshire in its place.  
A from the same vantage point as
the lead photo of the old staging yard above.


Sunday, September 9, 2018

"Surround" or "Screened" Staging - Inspiration for CP staging

If you study the track plan in the link above you'll note the Staging and Feed mill, both of which represent the Canadian Pacific "side" of Richford, are somewhat underdeveloped. 
At the same time, the Central Vermont Richford branch, which originates in St. Albans, also needs to be factored in (those CV trains will end their run - actually they'll turn - in Richford - but the CV branchline trains need a place to go to/come from. 
I toyed with several arrangements - some of which started getting ever more complicated. 
Inspiration for how I'm planning to address all this is coming from an article in, of all places, the January 1987 issue of Railroad Model Craftsman. While I shared several of my early influences HERE, in a post that is among the most read on this blog, I likely didn't encounter the January 1987 issue of RMC until several years after it was published (I was in Navy Main Propulsion school in January 1987 and up to my eyeballs learning the inner workings of ALCo diesels, so I didn't get do any model railroading or rail fanning at the time).  
But when I did see this issue one article did make an immediate impression on me. I was on the Model Railroader staff and looking for a design for a layout to fill a spare bedroom when Andy Sperandeo referred me to this article: 


This is a Christian Day design for a layout depicting the Grand Trunk's operations in and around South Paris, ME.  What was most intriguing about the design was the way he handled the staging. In fact, it was an early version of what has come to be called "Surround Staging" - rather than me typing a long description, a quick study of the track plan makes the concept pretty obvious. 
I actually used a slightly modified variant - with the staging tracks placed behind a low 2-D and some 3-D scenery in what I called "screened" staging in a previous layout - so I know the idea works and is quite effective - and is certainly a heck of lot easier than placing staging tracks below the scenicked level on a model railroad. 
"Screened Staging" on a prior railroad. 
I suspect if you tried to build Christian's plan in the size room he shows in this piece I think you'd be disappointed at the results. But I know I'm not the only one who's been inspired by the concepts demonstrated on this seemingly simple track plan. Andy once lamented to me that he couldn't get Christian to do any layout design articles for MR! 
In fact, combine the South Paris Switcher with Andy Sperandeo's San Jacinto branch, a design that was completely misinterpreted as underwhelming at the time it was published, and you have the acorn from which many of today's "achievable" layout designs have sprouted. 
I'm going to hold off sharing the specifics of how all this is (hopefully) going to work on the track plan until I have a chance to draw it out to scale. 

Wednesday, July 22, 2015

Key Pieces of White River Junction

I've had some inquiries from my post the other day showing one possible change to the White River Junction section arrangement. I think it may have confused some people - in fact I know it did! I didn't make it clear that the plan DOES NOT reflect the current track arrangement. In fact, the proposed "new" plan is a compromise from the prototype. 
In an attempt to clarify - 
here's an aerial photo from 1953 showing the station area at White River Junction, Vt. From the UVM web site. I added the labels to show some "key" elements. 

The orientation of this aerial photo is close to how my layout's White River scene is presently arranged - the station is to the left and the CV yard is north - to the right in this photo - as you look at the layout - and when you're standing in my aisle you're really in the White River.
My main issue with the current arrangement is the staging yard - it's on a stub-ended shelf through the large mouse hole. And, speaking of the mouse hole, well that's issue #2 - but as we add more and more elements to the foreground and continue the scenery into the staging yard it becomes less and less obtrusive 

But it doesn't change the fact that the staging yard itself is a real problem….And now here, for the first time anywhere - the "Backstage" View. I've lost count of how many times I've bumped into the end of this damn "temporary" staging yard.