

Wednesday, March 18, 2020
Friday, March 13, 2020
Viral thoughts
As of today (March 13, 2020) due to concerns regarding the Covid -19 virus all of the planned events listed HERE, with the exception of MARPM, have been cancelled or postponed with no new date identified.
Sorry I'll miss seeing folks at these events, but I hope to be able to post revised dates as things sort themselves out.
One thought. I've been reading several blogs and message boards today where people are:
(1) Lamenting the cancellation of train meets, shows, and other hobby events, and/or
(2) Worried about the impact of a global pandemic on the production of model railroad equipment, especially overseas.
With regards to Item #1. Model railroading is a great hobby, but it is just that, a hobby. The organizers of these shows and the owners of venues where they're being held aren't enjoying this situation any more than you. And while it's a bummer that you won't have yet another opportunity to purchase more, perhaps we should all take this opportunity to build some of the stuff we have.
The answer to #2 is simple - yes, there will be an impact. There will certainly be delays, and I'm sure some of these will be significant. Some model train manufacturing facilities overseas may not survive. Some model railroad companies in the US might not survive.
Frankly, I could care less. The hobby will go on. Besides, there's little or nothing commercially available in the RTR market suitable for a Central Vermont branchline that I don't already have, so I'm covered.
We need to keep things in perspective as far as what's truly important, and what's not. As of today, my office is still open, but I wouldn't be surprised if we are told to work from home at some point, most likely next week.
If that happens, my plan is take the three hours a day I currently spend commuting, as well as those weekend days I won't be at NMRA and RPM meets over the next month, and try to work my way through my rather extensive stash of kits.
Here's hoping many of you take the opportunity to do the same.
For now, please listen and comply with the instructions of health care professionals and take care of yourself and your family. There's no reason to panic, but there's every reason to be prudent. Besides, I'm looking forward to seeing you at an RPM meet at some point in the future - hopefully sooner rather than later!
Wednesday, March 11, 2020

Monday, March 9, 2020
"Agricultural Implement & Paint Dealer" - Part 8 - Initial painting and terraforming

Got an initial coat of paint on the implement dealer this weekend, including a coat of paint on the raised seam roof.

For the main walls I dry-brushed a coat of two craft paint colors - about two parts of one called Snow White (any "real" white would work) and one part of a very light cream (or off white) color called "Parchment."
While that was drying, I cut a piece of 1" thick foamboard to fit between the front edge of the layout and roadbed, and carved it to shape. There's still some work to do here, but I did pose in the building in an approximate position.

The rear wall of the building was painted a barn red color (not shown), for some variety if nothing else. Frankly, the rear of the structure will likely end up almost completely obscured by brush and trees.
I also made some progress on the Thresher's Mill diorama (I don't really consider these dioramas, but structure bases with a small amount of landscaping around the building itself, but that's a subject for another post.
I'm getting ever closer to wrapping this seemingly never-ending project up!
Friday, March 6, 2020
"Agricultural Implement & Paint Dealer" - Part 7 - Fascia and Freize Boards

The Implement dealer building is certainly one of those plain or understated buildings, but the wild assortment of additions and changes to the prototype structure over the years produced an interesting building. "Simple shapes combined into a complex whole" may be one way to describe this thing.
Last night I tackled one thing I don't really love about building structures, the fascia trim and freize boards. The one good thing about getting to this stage is that it means the end of this endless project, while not here, is certainly close!
 I started with the fascia trim. For most buildings this isn't a single piece of lumber, it's actually comprised of several pieces of descending widths. Studying prototype photos over the life of the building showed at least three different arrangements of the fascia trim, so I opted to go with what I thought looked good on the model. (You may remember from one of the initial posts on this project, I don't actually have photos from my modeled era, only decades before, and decades after - so some logical guesswork is called for!). In the case of this building I went with a wide board on the bottom, and two additional boards on top. The trickiest part of this step is getting the correct angles on both ends of the fascia trim. I started by laying an over-length piece of styrene onto the side wall being sure to get the styrene to line up with the roof on its length and one end.
 Next, I used a square to locate the angle on the top of the board. NOTE: In this case I marked the line with a pencil so it would show up in the photo - in truth the pencil line is too thick to create a mark accurate enough to make the cut. I usually mark this angle by scribing it lightly with the tip of an X-Acto blade.

Once the fascia was completed I added the freize boards to the underside of the roof overhang on the side and rear walls of the building.
Then I added the trim to top of the "false front" section of the structure on the front wall (lead photo above).
After all that was done, I gave the model another light coat of primer gray, focusing on the roof and trim.
Tuesday, March 3, 2020
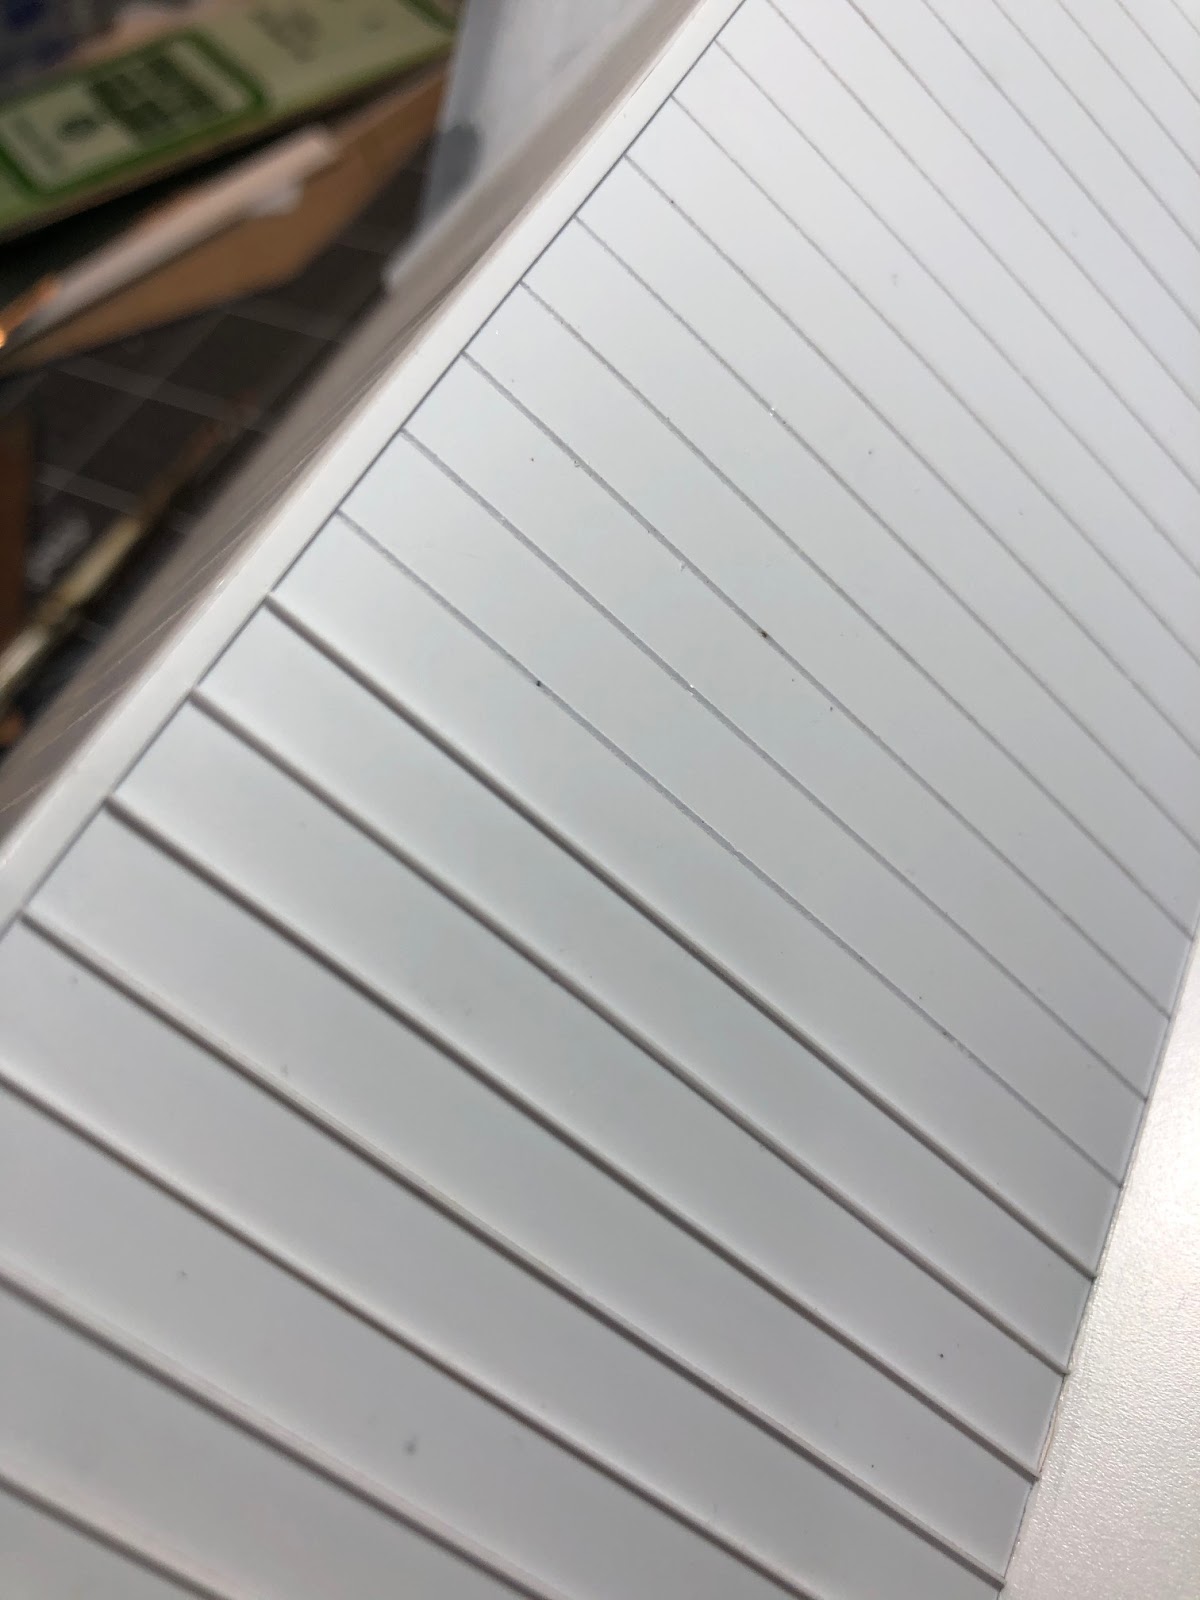
"Agricultural Implement & Paint Dealer" - Part 6 - Ribs, lots of ribs ...
Roof ribs, that is.
I've noticed a lot - the majority in fact, of the smaller industrial and agriculture related buildings along my prototype feature standing seam metal roofing of one form or another. Over the years I've tried all kinds of ways to model this, from paper with stripwood "ribs" to Builders in Scale metal roofing, such as on this model of Ben Thresher's mill.
Frankly, when it's painted and weathered the real metal roofing looks perhaps the best, except the material is just a little too thick, meaning for this building, with all its valleys and angles in the roof panels, I didn't think it would offer the best approach.
Instead I opted to go with Evergreen styrene metal roofing. This material is easy to work with, but the most tedious part is adding all those ribs to the slots in the roof sheet.
For a situation where the ribs end at the bottom of the roof, simply install the slightly long ribs along the length of the roof and then trim the ends flush. For areas where the ribs run between two other sections of roof, or one section and the peak, it's a little more tricky.
Here's how I do it:
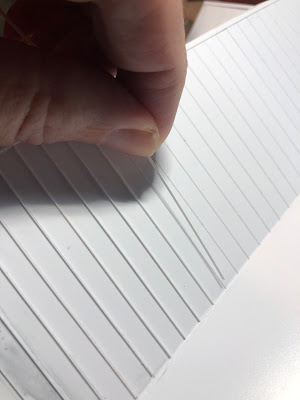 1. After the roof panels are in place, and the strip styrene ridge cap (a 1x6 styrene strip at the top of the peak) I cut the rib overlength and insert the bottom of the rib into the slot. That plain styrene on the right is the subroof on another portion of the building - meaning the ribs are running between the ridge and another roof panel.
 2. Once the bottom of the rib is in position, lock it in place with a slight amount of styrene cement or MEK applied with a needle applicator or a small brush.
 3. Once the cement has dried, insert the rest of the rib into the remainder of the slot. I focus on getting the rib into the slot and with no gaps or waviness. Leave the rib overhanging the ridge cap slightly at this point.
 4. Use flush cutting nippers to trim the rib just inside the base of the ridge cap. Then run styrene cement along the entire length of the rib.
 5. Repeat Steps 1-4 ... a lot ... (!)
I've noticed a lot - the majority in fact, of the smaller industrial and agriculture related buildings along my prototype feature standing seam metal roofing of one form or another. Over the years I've tried all kinds of ways to model this, from paper with stripwood "ribs" to Builders in Scale metal roofing, such as on this model of Ben Thresher's mill.
Frankly, when it's painted and weathered the real metal roofing looks perhaps the best, except the material is just a little too thick, meaning for this building, with all its valleys and angles in the roof panels, I didn't think it would offer the best approach.
Instead I opted to go with Evergreen styrene metal roofing. This material is easy to work with, but the most tedious part is adding all those ribs to the slots in the roof sheet.
For a situation where the ribs end at the bottom of the roof, simply install the slightly long ribs along the length of the roof and then trim the ends flush. For areas where the ribs run between two other sections of roof, or one section and the peak, it's a little more tricky.
Here's how I do it:


Monday, March 2, 2020
Weekend Report

After the clinic the crowd broke for lunch, and I hightailed it the block or so to our house to prepare for an open house for those same clinic attendees.
The open house went well. I got comments, some obviously tongue-in-cheek, others not, about why I didn't fill the other 2/3rds or so of the basement with railroad. Obviously, those folks haven't been reading this blog for any length of time. Or perhaps my reasoning (SEE HERE) wasn't as obvious to them as it is to me?
Highlight for me was having Lance "approve" of my execution of his design - and he agreed the addition of the East Berkshire scene in place of a staging yard was an improvement.
So good things, all around.
 After the open house I kept working on the standing seam roof on the implement dealer. I'll have a more detailed follow up on that project sometime later this week.
 Sunday morning involved some household chores, but by mid afternoon I was able to head downstairs and work some more on the roof, and even started blocking in some basic backdrop painting (primarily a horizon line and some far distant hills.
 One thing I learned from the last layout is backdrops are much easier to deal with, both in the creation and photographing of them, if they are kept very subtle, and the horizon line is kept extremely low (you can barely see the penciled-in horizon line in the photo on the right). Then I blocked in the distant hills and some clouds (see below). At this point it seems like the horizon is taller than it should be, but when foreground scenery elements are added the visible horizon line will be lower than it might appear at this early stage.
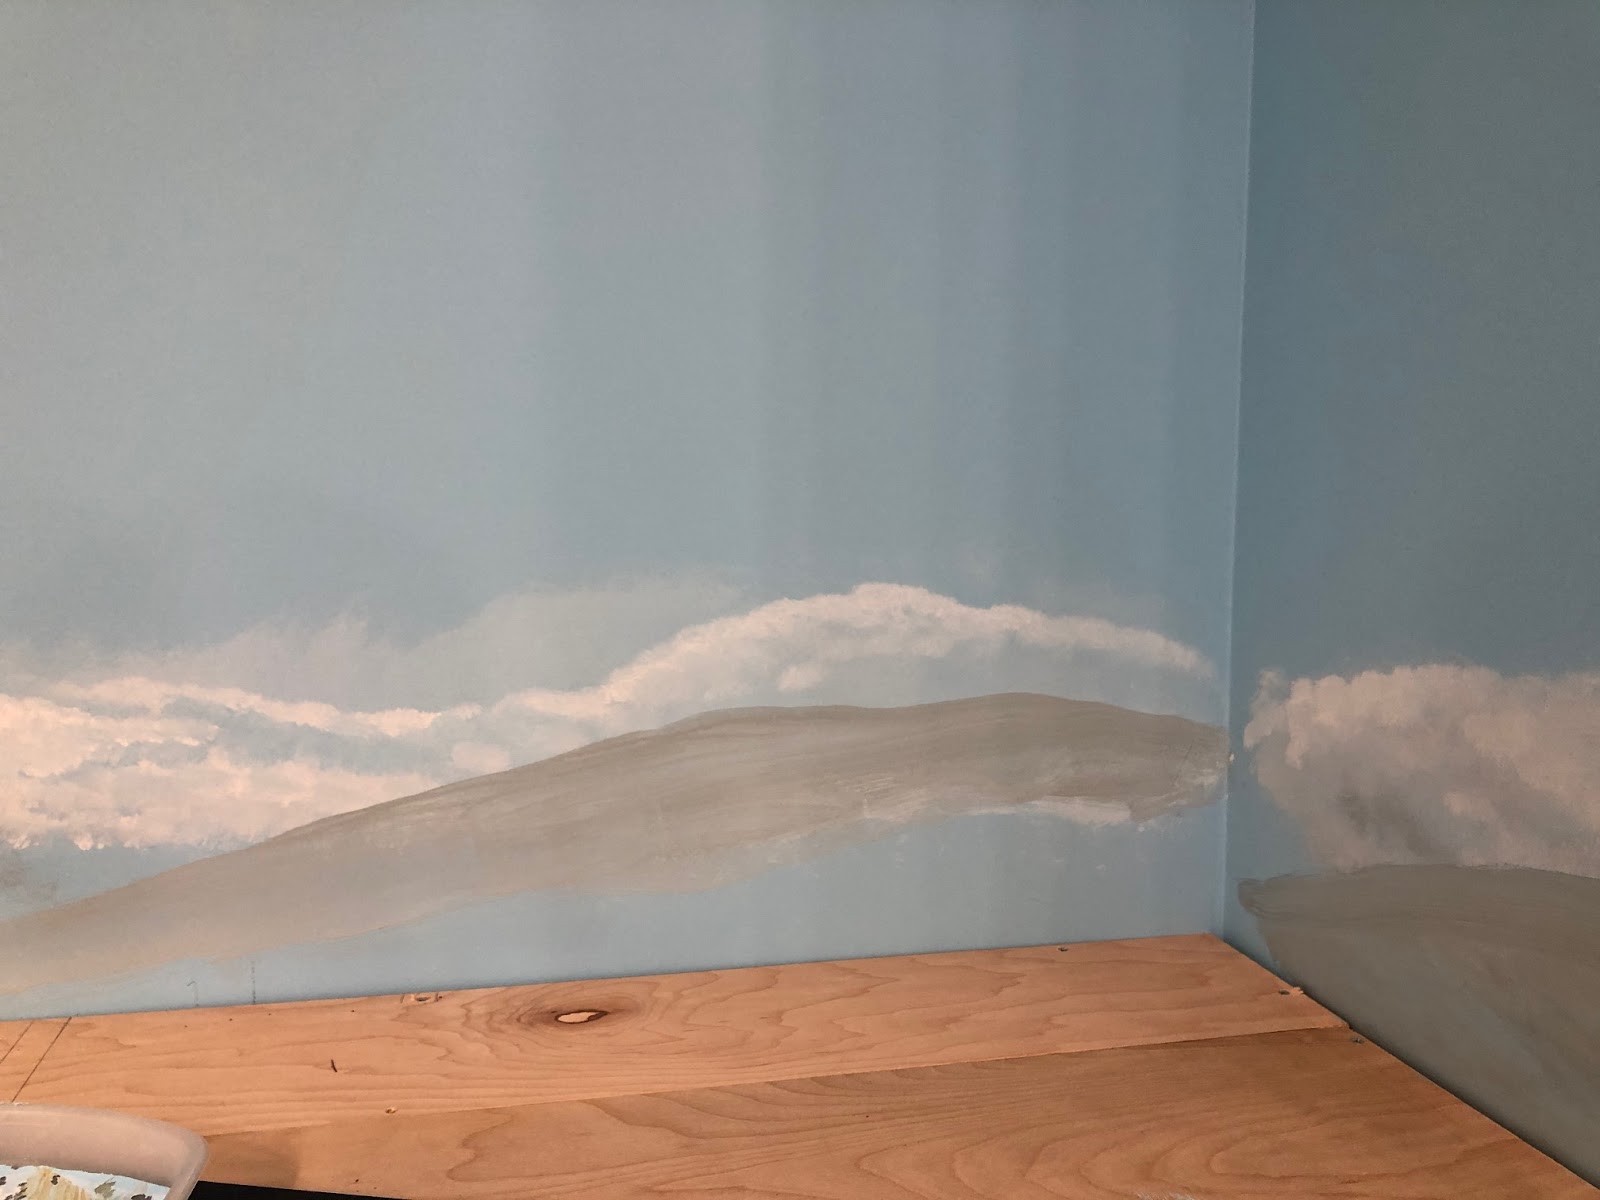
More to follow. And, if this doesn't work out, it's a simple matter to erase it with a coat of blue paint!
Subscribe to:
Posts (Atom)