Showing posts with label Progress Report. Show all posts

Sunday, March 5, 2023

Missisquoi River Scene

The major area I have been working on in the last couple of months has been the Missisquoi River crossing at Sheldon Junction. This is the area between the store scene (above) and the swing gate opening. This has been a project beset by challenges and issues, but I think I'm past most of those now. It started with issues assembling the Central Valley truss bridge. The latest challenge was when suddenly locomotives lost power halfway across the bridge - after I'd gotten the bridge installed (of course, everything worked fine before I put in the landform scenery.)

After rewiring all the feeders last night in this section of the layout everything worked great - except on the bridge itself. After some work with the voltmeter I figured out the problem was a loose rail joiner at the point where the bridge joined the mainline. As a rule I don't like to solder rail joiners but I made an exception here. Just one more challenge in a string of issues that have made this project such a joy!  

When I started working on this scene I considered doing some sort of step-by-step. Frankly I’m so sick of working on it at this point I want to just get it done! 

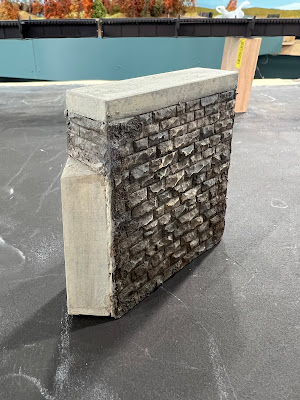
The multi-span bridge obviously needed a pier in the center. The prototype was stone (the stone abutments by my era had been replaced with concrete ones). I started with a Chooch pier but it was not only too big it was a “challenge” to cut the resin. Are these things Kryptonite? So my poorly cut Chooch pier went into the trash and looked for another solution. 


I dug a Walthers plastic concrete pier out of a box. The Walthers part and some of that Chooch flexible peel and stick granite made a passable result. Some paint and weathering and all was good. 

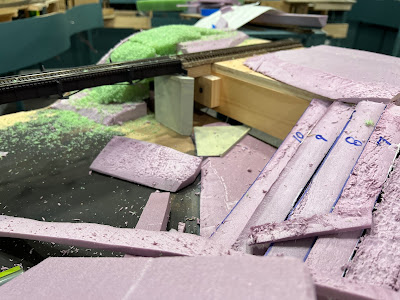
After the considerable enjoyment of hobby time to build the bridge itself out of Central Valley Truss bridge kit components, I installed the bridge deck, and abutments and stacked (vertically and horizontally) pink foam, installed the abutments, carved the foam to shape, added Cripplebush rocks as rock outcroppings, and a base “earth” texture. 

I dug out some half finished trees to determine how many I needed and roughly where they look “right”. There’s one or two spots where none of the trees really fit - I may twist up a couple of wire trees to fill the gaps. 

Next steps are static grass and other textures to the “open” areas and spending a couple of evenings this week in front of the television with the glue pot to attach the Super tree sprigs to the tree armatures. 

Apologies for the lack of depth of field in these photos - they are truly grab shots with my phone. 

Monday, November 28, 2022

A quick update

I haven't really posted much on the blog the last five or six weeks - but that doesn't mean things haven't been busy in my model railroading world! 

Three (!!!) open houses from early October until now. 

Before the first open house I managed to get a fair amount of "open country" scenery "completed." Of course, there's always the chance to go back and add more "texture" - but I did convert a fair percentage of the layout from "plywood pacific" to something looking more like rural New England. 

About a week before the first open house I put the brakes on layout work and did nothing but clean off the layout, clean the track, and make sure things looked ship shape. It was really hard not to dive back into messy layout work before the other open houses. It took all my will power but I managed to keep the layout and the layout room looking presentable.

That doesn't mean there was a complete lack of progress. For example, I got the paper mill peninsula track and wiring completed before the second open house.  

Obviously, this building, and/or the benchwork, needs some adjustment!

I even managed to meet with Bernie Kempinski and get the "old mill building" for the paper mill complex cut on his laser. Somehow, we ended up with a structure that's too large to fit the space for it. the main culprit is the single story "wing" on one end of the building. I have a couple of ideas to fix that issue. 

The open houses provided a chance to run trains over the layout for an extended period of time. I'm thrilled to report for the most part everything works well - and we've only got a couple of minor trouble spots that could use some tweaking. 

Completing the rework of the paper mill peninsula means trackwork is basically finished and the next step is to complete ballasting of the track. I didn't want to mess with ballasting between the open houses but I hope to get that done over the course of the holidays. (Ballasting is one of those tasks that's best done in short frequent work sessions - ideal for this time of year!) 

In the next few months I'd also like to (at long last!) get the through truss bridges installed. 


Wednesday, September 14, 2022

Tile Grout Pavement - Create a Road to Somewhere...

Sanded tile grout pavement in place. Note the subtle variations in color and texture in the "older" pavement on the left. This was done by "stirring in" small amounts of darker and earth-tone grout when still dry.  

Since I built the basic benchwork going on three years ago, the town of Enosburg Falls, which is right up front when one comes down the stairs into the basement, has remained a partially scenicked, half done repository for stand in structures, surplus rolling stock and an assortment of tools and modeling supplies. And that's on top of the layout!

Getting the underside of the layout looking presentable was step one. The next item on the to-do list was to get the top of the railroad cleared off and at the very least ballast the track and install the roads. 

I won't elaborate on ballasting the track. I used pretty standard techniques. One thing I'll add about ballasting - a little ballast goes a LONG way, and too much ballast can reduce a well running layout to an engine stalling, derail inducing, mess. So when you ballast track use about half the ballast you think you need - and be especially careful with it around turnouts! 

I've tried all types of methods to make roads in the past. For smooth paved roads I think styrene may make be the best choice. But in this case I was looking to create an older, faded somewhat rough road. I tried Ceramic Stucco texture - which I've used with some success on building foundations - but that stuff is pricey. I also tried AK Interactive asphalt and concrete texture. I found the texture just a little too gritty for HO scale (it's great in larger scales) and if you think the artist medium like the Ceramic Stucco is expensive, just wait until you see the price for a very small tub of the AK stuff!


Oyster Gray - much lighter
than it appeared on the label.
 
I use tile grout as a base earth texture since it's easy to work with and inexpensive. I use sanded tile grout (for those who don't know, there are two basic types of grout - sanded, and unsanded). The sanded dries with a slightly gritty texture as you may expect. 

I went to Home Depot and ended up with two bags of sanded grout - one was a light gray color called Oyster Gray, the other a very dark gray (almost black) called Charcoal.  

Since neither color looked right I started combining them together. I worried I'd get a "salt and pepper" effect but frankly the stuff is fine enough that it really blended into a single color. 

About a 70-30 blend of Oyster Gray
 and Charcoal produced a faded
pavement color
.
 

Applying it is simple. I put masking tape to mark the width of the road and create a sharp transition from paved to unpaved areas. After mixing the grout to the desired color apply it dry to the area of the layout you want to pave. Then use a disposable foam brush to smooth the grout. I noticed the lighter gray grout tended to have clumps - these were easy to break up during the smoothing process. 

You can introduce subtle changes in the pavement color by manipulating the dry grout with the foam brush. You can also add more dark or light gray grout as desired. I even tossed a small amount of earth toned grout into the mix to warm up the pavement slightly. 

The last step is to secure the pavement in place. For this mist the grout with a mixture of alcohol and water (about 25% alcohol/75% water). Start with a gentle mist to "lock" the grout in place and then completely soak it. The next day it will be rock hard. 

In other news, I also started working in the basic landforms in the Berkshire area. Old magazines make great weights to hold the foam in place as the glue dries! 

And I've gotten most of the basic landforms in place around Kempinski Curve. It's ready for grass, foliage and some trees. 


Tuesday, August 10, 2021

More backdrops

 Work continues on the basic scenery landforms around the staging yard. I managed to slice my finger pretty good with a box cutter - I attempted to slice a section of foam off a block while steadying it with my other hand - and let's just say that put a damper on any further progress that evening!

I've also managed to complete painting the initial base coat of the background hills along the long wall of the basement. 

Now that my finger is no longer throbbing I should be able to add the highlights to the backdrop trees. 

Here's a couple of photos showing some sections of the backdrop - sorry, no photos of the finger... 


Wednesday, February 3, 2021

New Video and a (quick) Progress Report

I realized that I haven't posted an update since just after Christmas. Yikes! time flies when you're (not) having fun!!

Frankly the first two weeks of January I was simply too depressed to head into the basement and do anything but binge watch Netflix shows on Formula One racing and a sci-fi action series called "The Expanse."

Then Chrissy came home one day and announced someone at her office had tested positive for Covid-19. She had a cough at the time, so figured she should get tested "just in case." Well, she turned out to be positive as well. 

I actually tested negative - so we did the whole "you live upstairs and I'll live downstairs thing" for the latter half of January. 

Good times.... 

And, although work has been nuts lately with the changeover in administrations etc... I did manage, at long last - to finally finish the Tortoise install project! I can also announce that the vast majority of wiring is also completed! 

My plan is to turn my attention from the layout and focus on bench projects - there are a number of half finished freight cars sitting around in various corners of the layout and workshop, and I want to focus on getting a South River kit finished. 

Which leads to a link to a video update on my progress so far on the South River kit, which you can find on YouTube  HERE

Monday, December 7, 2020

Shifting Priorities


I've been making steady progress on the layout.  As you can see in the lead photo scenery is well along in one area. I was about to dig out the static grass when a shift in priorities has meant the latest progress, while important, is not quite photogenic. 

When I first planned the layout, my goal was to complete major construction  - essentially all track in place and operating, and a base coat of scenery everywhere - in three years. 

In my mind that meant manually thrown turnouts (for example) were acceptable for "Phase 1" - and I may or may not at some point after that magic three year deadline go back and add switch motors, or replace some initial kit buildings with scratchbuilt ones, or replace the stand in Bachmann steamers with finished, sound equipped models. 

But the overriding goal was to get things looking "complete" to the casual visitor in three years. (For the record, the third year anniversary is August 2021, so this isn't a matter of missing a deadline and copping out!). 

Why three years? Because two years seemed like it would be too much effort, and five years sounded too long. You can find more discussion in previous posts "The Design Questions We SHOULD be Asking" and "Think Layout's Lifetime, Not Lifetime Layout."

Since I figured I would power the turnouts, and more importantly, the frogs, at some point as I laid the track I  cut a slot under the points for the throw wire. I also soldered a wire to the underside of each frog. 

Then Covid hit, and the plan to maybe have some initial operating sessions was scrapped. And it became obvious a couple of months ago that our annual Christmas open house for friends and neighbors was also not going to happen. 

Perhaps I should shift gears and focus on getting the planned future "electrical improvements" done now instead of later? Besides, getting the frogs powered would also move the brass engines up on the "to do" list. 

I burned through my initial supply of Tortoises equipping the mainline "loop". I managed to replenish my supply of switch motors, meaning yesterday's layout work session was spent pre-wiring a bunch of Tortoises and the associated toggle switches. These are destined for the paper mill peninsula.  

I also added a DCC circuit breaker (visible in the photo with the pile of pre-wired toggles!) to the paper mill peninsula. And during my lunch break this afternoon I got the Walthers turntable (re)programmed. 

I might even dig the Diamond Scale turntable and NYRS controller out - after all, it's going to be months before anyone comes over!


Monday, July 13, 2020

Terraforming

A week or so ago, Lance Mindheim asked me to provide a couple of photos showing the railroad as it sits in the basement for a layout design book he's writing. 
My first thought was "I really need to clean this place up" - Covid-related quarantine has meant no visitors, group work sessions or the like, so the tendency to leave tools and supplies on the surface of the layout has become an issue. One I needed to deal with whether or not there's a photo shoot looming!
Then I reflected on my own books, and how they can stay in print for a number of years. "Do I really want," said I to me (since there's no one else here most days....) "to have the first photo of the layout published to show a sea of unpainted plywood with unballasted track?"
The answer led me to put aside the Great Tortoise Install and focus this weekend on trying to get some scenery looking at least a little respectable. 
The result can be seen in the photo above. One neat part about building landforms is that any one of several methods can be used. And all that really matters in the end is the top 1/64" or so - since that's all that really shows. 
My preferred method for open, or relatively open, areas such as fields and pastures, is cardboard webbing. For tree-covered hillsides I really prefer green florists foam. The webbing will get a coat of plaster cloth followed by a skim coat of plaster to create the hardshell. The green florist foam will get a coat of paint followed by ground texture. As an aside, I've never understood why anyone would go through the added expense of using the foam scenery base, and the added trouble of carving it to shape, to then cover it with plaster cloth of other texture material. That seems to me to be negating the primary advantage of using the stuff - which is to easily "plant" trees an the like. 
After finishing the waterfall on the Thresher's Mill diorama "off layout" I installed it in place. I still need to  blend the river surface and finish the rough landforms to the right of the river crossing. I hope to spend some time this evening getting that done and getting a start on the plaster cloth. 

Luckily, I saved a lot (three large appliance boxes!) full of finished fall trees from the old layout, so the hillsides should be tree covered very quickly. LAst winter I trimmed our two Crepe Myrtle trees to get some tree armatures. Those have been sitting untrimmed in a couple of boxes in the garage, so yesterday while waiting for the dogs to dry off from their baths I sat with them on the deck and trimmed the seed pods off. 
I don't think I'll have time to complete the foreground trees for the photos for Lance, but I did want to get my car in the garage and these things were in the way!
One more note - the scenery doesn't connect directly to the walls - I cut profile boards and mounted the cardboard strips and pieces of foam to the profile board - leaving about a 1/4" or so gap between the back of the scenery and the wall. This way, if I want to add a photo mural backdrop in the future I don't have to try to trim the bottom edge to follow the scenic contours. I also might try something with the lighting to shine light "up" on the sky. But that's a project for a day in the far future!


Monday, May 4, 2020

A huge Milestone and mocking up backdrops

My original goal when I started this layout was to have the major infrastructure - benchwork, track, and wiring with basic scenery. I'm pleased to report that this afternoon, approximately 18 months after starting construction on the layout, all the track and wiring are completed well ahead of schedule. 
I've even gotten a start at roughing in the scenery, especially in the Enosburg Falls area around the implement dealer (come on, you didn't think I'd have a blog post without mentioning the implement dealer, did you?!)
One thing I've been thinking about before starting the around the walls scenery is the backdrop. One possibility I'm looking at is using Trackside Scenery's (for their website, click HERE) line of photo backdrops. 
I even mocked up a couple of possible arrangements. 
Trackside Scenery offers a varied and versatile line of backdrops, and the quality of the images is second to none. 
Unfortunately, they have a limited selection of fall backdrops, and the ones they do have are very - uh "vivid" - neat but as this test shows, so much fall backdrop might be a bit overwhelming on a relatively large layout. And since there's only a "Fall Valley" series (in the center of the image below) and a Fall Mountain series, I think the backdrop may end up just a bit repetitive. I don't know a lot about backdrops but I do know you (1) don't want them to be obviously repetitive and (2) they should complement, and not distract from the 3d modeling. 

For my second attempt I used backdrops from two different sets the Hickory Hollow and Valley Flats series - both of these are in the "green season." 
Frankly, I'm seriously considering doing the layout's scenery in the green season - for variety if nothing else. All, and I mean, all of my layouts since I was a teenager have had falls trees. Maybe it's time for a change of pace?
To that end, I even tried painting a couple of my fall colored Super trees with an overcoat of green paint. I'm happy to report that works, and actually adds another layer of color to the tree that makes it look pretty realistic. In fact, if I stick with the autumn trees I'd likely give each one a misting with the airbrush before installing them. 
But let's return to the backdrop:
Frankly, I think the profile of the distant landscape looks much better than with the autumn backdrop. 
I also like how the fascia (and the underpinnings of the layout) are all the same bluish green color. 
What I don't like about either of these is the obvious point where the top of the "sky" ends and the sky blue wall color begins. 
There's something like 2 feet of additional light blue wall up there - and it doesn't look natural. 
One solution would be to trim the backdrops at the treeline - and eliminate the photo sky. Frankly, I think that border between the photo backdrop and the wall can be as difficult to get right as painting the whole backdrop in the first place. 
A possible solution would be to simply paint the band of blue above the sky to match the fascia - creating an upper valence with paint. 
Photoshop makes it easy to rough this in, just to see how it would look. Forgive my rough photoshop skills, but I did this in literally 5 minutes before dinner. 
I wasn't sure I'd even like this, but frankly I think it sets the layout off better than running the blue up to the ceiling. 
I still haven't made a final decision on the backdrop, but I do really like the darker color defining the upper limits of the sky. 

Monday, March 2, 2020

Weekend Report

Had a fun-filled model railroad weekend. Started off early Saturday morning, when about three dozen modelers from Northern Virginia, Maryland, and Pennsylvania gathered at the club house in our neighborhood to listen to Steve King and his two-part Timetable and Train Order clinic. 
After the clinic the crowd broke for lunch, and I hightailed it the block or so to our house to prepare for an open house for those same clinic attendees. 
The open house went well. I got comments, some obviously tongue-in-cheek, others not, about why I didn't fill the other 2/3rds or so of the basement with railroad. Obviously, those folks haven't been reading this blog for any length of time. Or perhaps my reasoning (SEE HERE) wasn't as obvious to them as it is to me? 
Highlight for me was having Lance "approve" of my execution of his design - and he agreed the addition of the East Berkshire scene in place of a staging yard was an improvement. 
So good things, all around. 
After the open house I kept working on the standing seam roof on the implement dealer. I'll have a more detailed follow up on that project sometime later this week. 
Sunday morning involved some household chores, but by mid afternoon I was able to head downstairs and work some more on the roof, and even started blocking in some basic backdrop painting (primarily a horizon line and some far distant hills. 
One thing I learned from the last layout is backdrops are much easier to deal with, both in the creation and photographing of them, if they are kept very subtle, and the horizon line is kept extremely low (you can barely see the penciled-in horizon line in the photo on the right). Then I blocked in the distant hills and some clouds (see below). At this point it seems like the horizon is taller than it should be, but when foreground scenery elements are added the visible horizon line will be lower than it might appear at this early stage. 
I went as far as using a couple of average height trees to ensure the horizon wasn't taller than the trees in most places, and spent a fair amount of time looking at the layout from an HO scale persons eye level to ensure the hills weren't extending above the top of structures and the like.
More to follow. And, if this doesn't work out, it's a simple matter to erase it with a coat of blue paint!


Friday, October 4, 2019

Progress 2 - The Sequel

It's like seeing an old friend. The turntable is a Diamond Scale kit built for my Locomotive Servicing Terminals book, circa 1998 or so. It's the last remaining physical remnant of SNE #1, and is being recommissioned to serve as the Richford turntable.  
As I mentioned in a previous post, I had high hopes for completing the "major" benchwork construction this past weekend. And, though I made some significant progress on what will be the Richford peninsula, I didn't actually finish it. 
Frankly I spent way too much time figuring out how to support the turntable "module". In reality, this is the old Palmer turntable mounted to the same piece of plywood I cut from SNE #1 when we moved out of the Oconomowoc house. Getting it level, lined up, and supported took the better part of last Sunday afternoon. 
I managed a fair amount of time on the layout a couple of evenings this week - so I'm very close to getting the benchwork on the Richford peninsula checked off the to-do list. 
Hope springs eternal to get this task completed this week. In the meantime, here's a photo showing the current state of the Richford peninsula. 


Tuesday, July 2, 2019

Layout Video Update #4


I've posted another video update. You can find it on YouTube by clicking on this LINK

I'm really enjoying doing these video updates - although if you're not careful video can become a real time sink and frankly I need to spend my hobby time working on the layout not messing around on the computer!

Appreciate any and all constructive feedback - positive and not so positive. Just remember, like the blog, this video is worth every penny you're paying for it!

And remember, a thumbs down vote, without some indication of why you feel that way, is virtually useless to me. 

I'll say that this particular update is a little more "what I'm going to do" as opposed to "what I've done" - something that didn't dawn on me until I was editing it.