Showing posts with label Scenery. Show all posts

Tuesday, September 17, 2024

A New Addition to the Layout - Part X - Blending everything together and an unveiling

The Mid-Atlantic Railroad Prototype Modelers meet (MARPM) concluded just over a week ago. As an aside this meet is proving to be a wonderful time and I strongly suggest you consider joining us in 2025! (details for MARPM 2025 haven't been finalized, but it will most likely be in the same hotel as this year (located near BWI). Keep an eye on MARPM.org)

I once again hosted an open house at my layout and did a "Layout Progress" clinic. This was the unveiling of sorts of the newly incorporated "Northern SNE" section. A couple of months ago my friend Bill Schultheiss offered to build something for the railroad. At first I'd planned to rework the steel girder bridge that had once carried SNE rails up in Massachusetts into a road bridge. But as Bill and I went back and forth on what he could build I mentioned the one thing every New England railroad needs - that I didn't have - was a covered bridge. So he took a couple of measurements and a few weeks later he brought a wonderful model of a classic New England covered bridge. Thanks Bill!

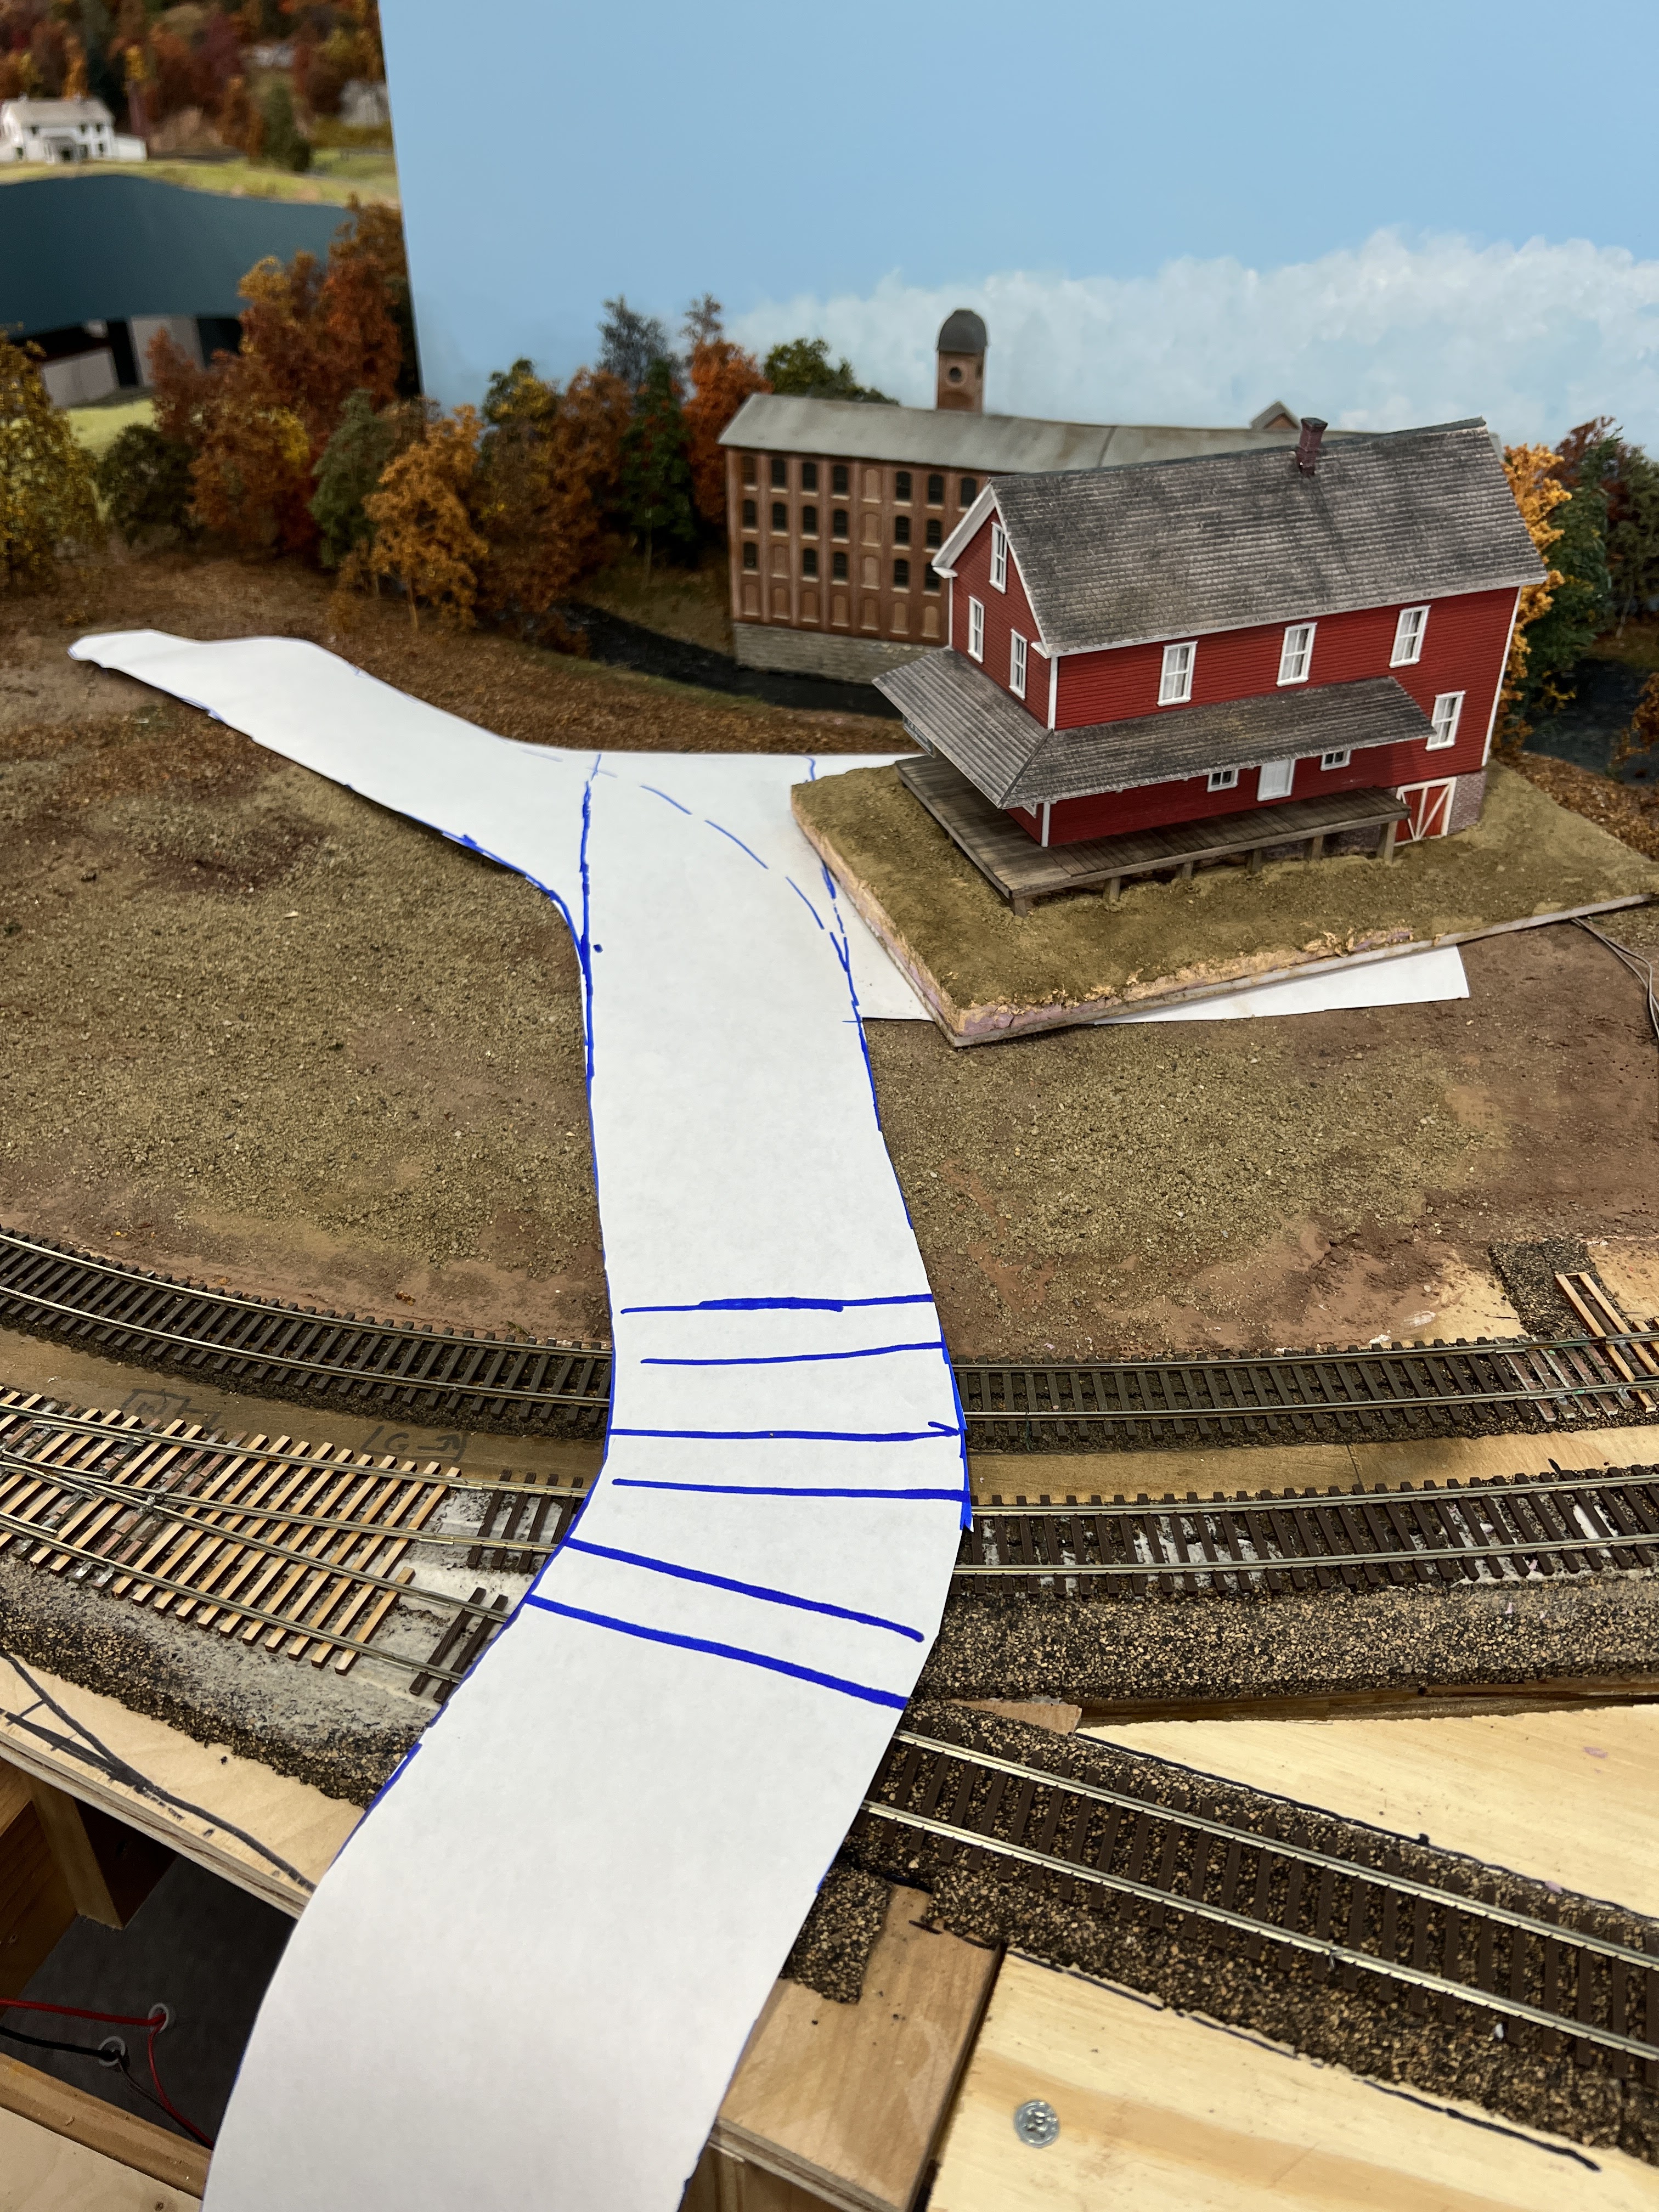
And the extremely short tail track at the stub end of the northern SNE section always bothered me - it was barely long enough to fit a 4-axle diesel and one car - but even my small steam locomotives with a car were too long for the siding - meaning I needed to splice a section of benchwork onto the left side of the town and add about 10" of track. At the same time I extended the road from the diner to the end of the added benchwork.

As I've mentioned before there was a 3 or 3.5 foot section of benchwork we added to connect the Northern SNE section to the existing layout. The track required some rework to get the everything to make sense. 

With the track down I used my new Proxxon foam cutting table to slice enough pieces of foam board to the same thickness as the roadbed, filled any gaps with lightweight joint compound and painted and added the initial layer of tile grout and sifted dirt. This "first layer" scenery is hardly show stopping but I was determined that no pink foam be visible! 

I showed the installation of an old structure that seemed a perfect fit for along the mill run in a previous post (HERE). I wasn't able to complete a couple of things in time for the open house. I had planned to finish a new mill building (another South River Models kit) - but frankly wasn't in the mood to work on it for a few weeks, then realized it was close to the open house and I had to get serious about cleaning up the layout room! 

I did two last minute things in preparation for the open house. The first was to roll a coat of paint on the fascia. I think this really helped blend the Northern SNE section into the rest of the layout. 

I also found myself staring at an open area across the street from Streeters Store. 

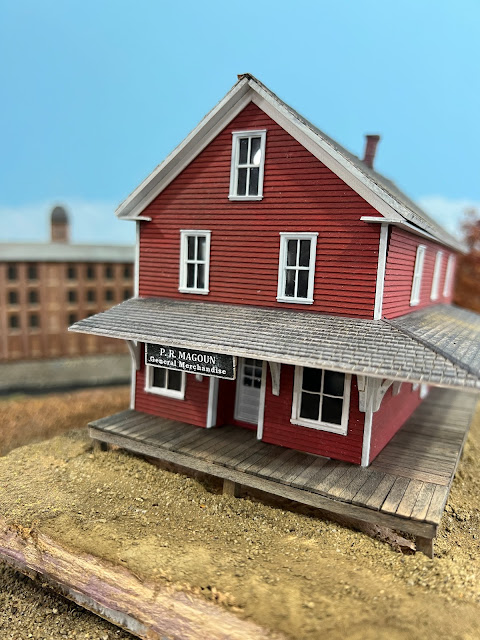
I considered placing the feed mill (that was included in the same kit as the store) in that spot - but it looked just a little too tight. Besides, the fact that the feed mill is on a slope would have required some benchwork/fascia modifications and I didn't want to make a whole new mess!

What I needed was something that was quick to build that could then either be redetailed or replaced with something else in the future without feeling like a waste of effort. A little Scupltamold to level some undulations in the ground, brown paint, and a few spoonfuls of tile grout and sifted dirt, along with a small shed and a couple of pulpwood loads, and a pulpwood yard was born. 


Still to come is the aforementioned new mill building as well as a freight house for the large open area to the right of the passenger station. And of course, a lot of grass and other textures. 


Sunday, August 4, 2024

Mill stream progress and filling gaps

As mentioned in my previous blog post I needed to fill the gap in the surface of the mill stream. Turns out a piece of Gatorboard that I had lying around was the right overall size - some quick work with a hobby knife trimmed it to fit the oddball shape of the opening. This was secured in place with a healthy bead of hot glue. One side of the building has a door and windows on the lower floor so I needed to have some open ground on that side of the structure. I cut more Gatorboard and added some Chooch cut stone material. The photo shows it being rough fit in place. 

Next, I cut a thin piece of foamboard to raise the mill building slightly above the water surface. Actually, it made the bottom of the building just about even with the "water" level. 

When I added the fascia the "Upper Road" (former roadbed on the Northern SNE) ended up with a gaping hole between the fascia and the plywood subroadbed. I trimmed several pieces of pink foamboard and used them to fill the gap. 


Thursday, June 27, 2024

A New Addition to the Layout - Part IX: An upper mill pond


When we removed the Charlton Branch section from Jason's layout we had to cut through the river. Although it went pretty well, the water did chip slightly and a couple of "chunks" of scenery separated from the subbase. I suppose I could have tried to blend it and add a new layer of Envirotex to blend everything together, but I wasn't sure that would even work and if it didn't work I was concerned it would mess up the remaining section of river and falls near Martin Machine that was in good shape. 

A logical - and easier - solution is to not try to patch the river but instead add another fall and a mill pond at a higher elevation. This has the added advantage of allowing for another mill building/complex. 

I did some rough measurements the other night and mocked things up. That seemed to go well enough that last nights "30 minutes a night" was spent cutting a mill pond surface (the leftover fascia piece - hence the color!) and the "land" - currently some 1" pink foam. 


Tuesday, February 13, 2024

A New Addition to the Layout - Part VII: Hills and trees


Work continues on connecting the Charlton Branch from the Northern SNE* to the main layout. In previous chapters of this seemingly never-ending saga I mentioned how I planned to use several sections of the large mountain that had concealed a helix on Jason's layout - meaning these were large, heavy plaster mountains! I placed the large mountain chunk in a place I thought looked good and would work - and there it sat for at least a month or more. I've learned over the years that if I run into something that stops progress on a project it usually means I'm not taking the right approach. It became obvious that reusing the big mountain chunk was simply not going to work. It was taller than the adjoining hill on the main layout, and would have required altering the existing finished scenery to effectively blend it into place. It was also going to be a challenge to route the track around the thing. So I removed it and replaced it with the salvaged piece that had been the very top of the original mountain. Immediately I could see this was a much better solution. Since the space on the layout was longer than the salvaged hill I sawed it in half and built up a new section of hill in the middle. I also used some of the loose rock castings salvaged from the original layout. 

In addition to the rock castings I was able to salvage a lot of Super trees from Jason's mountain. I did dip each of the armatures in dilute matte medium before coating them with a variety of Scenic Express Super Leaf fall colors. You can find more on what flocking I use and the color combinations in my blog post HERE.

After "planting" the trees I stepped back and admired my handiwork. (Forgive the plaster dust visible in some spots - obviously that will get covered with some ground texture!) I think the renovated hillside nicely compliments the structures on the Charlton section. Next step is to add the track connecting Charlton to the main layout. Then I can do something about that stretch of track to nowhere that runs over the bridge. 

* Jason sent some photos showing the progress he's making  rebuilding in his new digs in Florida. So does that mean mine is now the "Northern SNE"? 

Thursday, February 1, 2024

A New Addition to the Layout - Part VI: Basic Background Scenery

Test fitting the background scenery foam panel. I think the road "extension" blends fairly well. 


I haven't touched the northern SNE branch section for almost a month or more since I've been focusing on background scenery on the mainline "loop" around the room. But I'd made a bunch more trees, and I was getting sick of tripping over the two chunks of the mountain that we'd recovered from the helix move disaster - but the mountain chunks were useable even if looking a little dusty and faded. 
We'd built a box framework section to fill the space between the main layout and the branch. I took two of the mountain sections and test fit them in place as seen here:
Obviously there's a need to fill the gap between the "chunks" of mountain! The roof of Charleton station is to the left. I grabbed a quick test shot from the "normal" viewing height looking over Martin Machine as well. 

Mostly to avoid working over the finished portions of the branch I cut a piece of foam board to fit the space between the wall and the finished portion of the branch. I added a couple of small hills to break up the pool table look and added two roads after marking where they connected into the existing roads on the branch section. One road runs straight across the addition (lead photo above) while the road by the station curves and goes up a slight hill. I'll show how these blend into the wall in a future post. I test-fitted the piece (below) before adding the initial scenic texturing in the workshop.  


Tuesday, January 2, 2024

Some New Scenery


After setting a record of not accomplishing anything on the layout for the last two months (holiday visitors, combined with a nasty head cold that I just couldn't shake for weeks...) I took some time between Christmas and New Years to get some additional scenery added to the layout. 

Actually, I started out intending to do some sorting of the scenery material bins - in the end it seemed to make more sense - and sounded a lot more fun - to actually use the stuff on the layout rather than simply sort it and store it. 

On a more pragmatic note, I also needed to get some step by step photos for my planned Autumn Scenery book. 

After making scads of trees, I concentrated my efforts on the open country running section between Berkshire and Stafford Mills. One thing I tried to create was the extreme overgrowth between a pasture or field and the railroad right-of-way. 

This scene still needs some refinement (I think the poles are a little taller than they need to be, and the clumps of Martin Welberg materials could be blended a little better, for example) but the scene is getting there. 

On disadvantage of modeling fall colors is the need for so many different colors, and textures, of materials. So the work area tends to spread out over adjacent areas of the layout, as you can see from this overall view of the layout section I'm working on - 


Thursday, October 5, 2023

Snippets of Progress - Background hills in Stafford Mills

One of the background hills visible behind the green building in Stafford Mills. That building is a Walthers kit leftover from my old layout. I put it here as a placeholder for the MARPM open house ... but I kind of like it! 
From the photos you can tell this is about making background scenery. It started out with cleaning up the workshop - really it did! 

I haven't had much of a chance to work on the layout since the MARPM weekend - fall chores, and a crazy month at work - thanks mostly to the bozos who work in the big dome building down the street from my office - have meant that by the time I get home I'm ready to sit down with Christine and binge watch a few episodes of something on Netflix (current choice is "Suits"). 

When life gets that this I try to come up with a railroad project that's easy to accomplish in spurts - and is something I can leave and quickly come back to. 

Prepping trees is one great project. 

Cleaning up the parts for a resin car is another. 

As I hinted at above, the project started with an attempt to clean up the workshop. I simply couldn't function in the shop any more - every horizontal surface was buried in something. And there was a stack of styrofoam chunks that always seemed to be in the way ... and a box full of Super trees ... You see where this is going? 

Typically I would take the foam, put it in another box and move them and the tree box "out of way" - which really isn't out of the way it's just slightly less under foot. 

So instead of moving that stuff I decided to use it. So over the course of a several short work sessions over a week or so I got some background hills completed. 

The area to the left of the junction with the paper mill peninsula has a spot where the track gets pretty close to the wall - the only real option for scenery there was a tree covered slope. It's also a little hard to reach. So I decided to build the background sloped landforms "off site"  and then add the trees etc... before installing them in place. 

I wanted to get some background scenery in place here before finishing up the area between the track and fascia. The area with the pink foam and unpainted plywood will get an industry of some type...

After cutting the styrofoam hills to size and rasping them to shape I covered them with scatter leaf. It's not terribly obvious here but I use wax paper to avoid gluing the hills to the plywood!

I ended up with three "segments" to create the hillside (Remember, I was starting with scraps!). This is the smallest one after the Supertrees had been added. 

The small hill "section" in place - note how the trees help screen the joint between the layout and the wall. The gravel parking area is tile grout with some fine dirt. 

The other two sections of background hills. Notice how the plywood serves as a palette!!

I have gotten some other cleanup done in the shop. I had been storing the larger sheets of styrene and brick texture sheets in a plastic storage tub on the floor. Problem was that particular tub has a lid that prevented me from stacking other tubs on top of it. So it sat in the middle of the floor (bad) or in front of the shelves on the floor (worse)! I got sick of tripping over the stupid thing.  A couple of additional shelves in one of the Ivar cabinets and all that stuff has a new home. And that tub is going out the door! 


Monday, May 29, 2023

Country Lanes for Stafford Mills

This aerial view shows the basic layout of the streets in Stafford Mills

Spent a couple of hours in the basement yesterday getting the foundation for the roads installed in Stafford Mills. 

The first step was cut away the area for the country store. Since I'd installed the store on its own rectangular base this was simply a matter of determining the stores final position (It's in a slightly different spot than in the previous blog post), marking the outline of the base, and sawing out the scenery. 

Although I planned to use sheet styrene for the roads, I didn't have any larger sheets of plastic so I opted to use cardboard instead. The first step was to take the paper templates (see previous blog post) and cut them apart to arrange them on the large sheet of cardboard in order to minimize wasting any material. I ended up with four sections.

I used a saw to create a smooth path for the roads. 

When installing streets in a hilly area you need to be careful to avoid overly steep climbs and sudden grade changes. And since the basic landform scenery was already in place there were a few spots where the road climbed a hill just a little too steeply, or the road wasn't level across its width. The solution was to trace the outline of the cardboard road pieces onto the ground and then use a utility knife and a fine toothed saw to produce cuts in the scenery. 

I did narrow the roads as they got closer to the wall. 


On the left side the road climbs to a slight crest before heading down towards the rear. 

On the right side the road will disappear into the trees. 

Once I liked how the road looked I glued it in place with hot glue, using heavy weights to hold it in place. 


The one problem with cardboard roads is that can easily swell and warp when painted - especially with acrylic paints. So I sealed the cardboard with Polycrylic sealer and allowed them to dry overnight. Note the road hasn't been extended over the tracks and to the fascia. That's the next step. 


I couldn't resist positioning the camera for a test shot to see how the scene was shaping up with the various elements in place. The plan is to include some "full scale" HO trees between the road and mill river in order to screen the brick mill and contribute to the illusion of distance. The large open area to the left may (I'm still not sure) become home to a white steepled church, a New England signature element if there ever was one. 


Saturday, May 27, 2023

"Next Stop - Stafford Mills"

This is the approximate position of the Magoun Store. 
With the Missisquoi River crossing scene completed it's time to head to the opposite side of the Junction and finish up the Stafford Mills scene. "Stafford Mills" is the name I'm using to represent Sheldon Springs. Why change the name from the prototype you ask? 

I could give you some long explanation that I was concerned that two or three operational locations on the layout named "Sheldon something" - would confuse operators. Or how I wanted to include some elements that weren't part of the prototype scene so I couldn't say I was "modeling Sheldon Springs." 

The real explanation is pretty straightforward: "Stafford Mills" is a town name I dreamt up back in high school while trying to look like I was paying attention in Father Brisette's chemistry class and I kind of like it... (the town name, not chemistry!)

For some details on how Stafford Mills got to its current state you can look at this blog post. You can also check out the two videos on "Forced Perspective" on my "CVSNE" YouTube channel. 

The impetus to work on this section of the layout was digging out the half (okay, maybe 3/4!) finished BEST Trains Trussell store kit. Long time blog followers will recall I planned to include this building in Williams Creek on my former Roxbury Sub layout. I got the building mounted to a Gatorboard base, stained the roof, and added a couple of Woodland Scenics Easy Lighting LEDs. I also created a poor man's interior using photos of General Store interiors I found online.

I made a sign for the front of the store - christening it "P. R. Magoun's General Merchandise" - named for a former NMRA president and (more to the point) fellow Navy veteran and long time friend and strong supporter of the SNE. Friends of the SNE get buildings named after them - enemies of the SNE get their names on a plaque in the SNE HQ men's room ....(!) 

The first step in getting the store in place was to find a spot that it looked right. This was a little tricky with the N scale brick mill in the background. In the end I settled on the spot shown in the photo above. 

The N scale brick mill in the background of the scene. 

I also wanted to add a road in front of the store that would ultimately run towards the paper mill complex and tie these (and some future elements) of the scene together. 

I started by removing a lot of the trees that I'd installed along the front of the background mill river. Then I carefully placed a large sheet of paper and marked the approximate location of one side of the road. Then I removed the paper and cut out the roads themselves. 

I'll use the paper road as a template to cut the road base itself out of sheet styrene. But that's for the next blog post. 

Tuesday, April 11, 2023

View from Above

I work with a lot of engineers - and it's their nature to really get into details - really minor details - in an effort to analyze problems and develop solutions. Which is why I constantly seem to be telling them "Sometimes it helps to step back and look at the big picture."

I'm currently trying to wrap up the requirements to (finally) complete my submission for the NMRA AP Scenery certificate. I almost got this done on the last layout ... and the one before that ... but for various reasons I never got things completely done to the point where I felt I could achieve the 87.5 points required to qualify for the certificate. 

This time I'm going to see this thing through - I wanted to include in the application a photo that showed the entire area being submitted for consideration. For the record the required minimum area is 32 square feet in HO scale - which the clever math whizzes out there have already figured out translates to a 4 x 8 sheet of plywood. Funny how that works! But I digress. 

The area shown in my aerial photo is more than 46 square feet - but it seems like a logical chunk of the layout. 

From the perspective in the lead photo everything appears "done" - or pretty close to being done. 

It's when we zoom down that we see there's still some elements missing that when added will elevate the scene. 

For example, the garage/tire shop at the rear lower lever of the store looks abandoned - not a bad thing - but it looks like a cleaning crew came through and cleaned up everything before it was abandoned! Needs weed, junk, stacks of old tires ... and perhaps a junker car or two? 

The street side of the country store needs details and more signs - some country stores were plastered with signs - I've noticed the New England ones that inspired my model aren't quite covered in advertising signs, but a few are certainly called for. I have a couple of other ideas for the front of the store that I'll keep to myself for now. 

Speaking of the street - it needs some additional detail and obviously some grade crossing protection. Minor, but important details not visible from way above the layout but a scene on a model railroad is really just a compilation of dozens (or hundreds?) of details that combine to make a believable whole. Isn't it?