Showing posts with label Sheldon Junction. Show all posts

Tuesday, April 11, 2023

View from Above

I work with a lot of engineers - and it's their nature to really get into details - really minor details - in an effort to analyze problems and develop solutions. Which is why I constantly seem to be telling them "Sometimes it helps to step back and look at the big picture."

I'm currently trying to wrap up the requirements to (finally) complete my submission for the NMRA AP Scenery certificate. I almost got this done on the last layout ... and the one before that ... but for various reasons I never got things completely done to the point where I felt I could achieve the 87.5 points required to qualify for the certificate. 

This time I'm going to see this thing through - I wanted to include in the application a photo that showed the entire area being submitted for consideration. For the record the required minimum area is 32 square feet in HO scale - which the clever math whizzes out there have already figured out translates to a 4 x 8 sheet of plywood. Funny how that works! But I digress. 

The area shown in my aerial photo is more than 46 square feet - but it seems like a logical chunk of the layout. 

From the perspective in the lead photo everything appears "done" - or pretty close to being done. 

It's when we zoom down that we see there's still some elements missing that when added will elevate the scene. 

For example, the garage/tire shop at the rear lower lever of the store looks abandoned - not a bad thing - but it looks like a cleaning crew came through and cleaned up everything before it was abandoned! Needs weed, junk, stacks of old tires ... and perhaps a junker car or two? 

The street side of the country store needs details and more signs - some country stores were plastered with signs - I've noticed the New England ones that inspired my model aren't quite covered in advertising signs, but a few are certainly called for. I have a couple of other ideas for the front of the store that I'll keep to myself for now. 

Speaking of the street - it needs some additional detail and obviously some grade crossing protection. Minor, but important details not visible from way above the layout but a scene on a model railroad is really just a compilation of dozens (or hundreds?) of details that combine to make a believable whole. Isn't it? 


Thursday, March 23, 2023

RPM EAST 2023


I'm heading up to Youngwood, PA tomorrow to attend the Railroad Prototype Modelers Meet (for more details on the meet see http://www.hansmanns.org/rpm_east/

I'll be premiering a new clinic - an overview of my HO scale Richford Branch, on Saturday morning. 

In preparation for the clinic I got enough of the Sheldon Junction river crossing done to take a photo. 

Hope to see some blog readers there - and if you're at the meet be sure to say hi! 

Sunday, March 5, 2023

Missisquoi River Scene

The major area I have been working on in the last couple of months has been the Missisquoi River crossing at Sheldon Junction. This is the area between the store scene (above) and the swing gate opening. This has been a project beset by challenges and issues, but I think I'm past most of those now. It started with issues assembling the Central Valley truss bridge. The latest challenge was when suddenly locomotives lost power halfway across the bridge - after I'd gotten the bridge installed (of course, everything worked fine before I put in the landform scenery.)

After rewiring all the feeders last night in this section of the layout everything worked great - except on the bridge itself. After some work with the voltmeter I figured out the problem was a loose rail joiner at the point where the bridge joined the mainline. As a rule I don't like to solder rail joiners but I made an exception here. Just one more challenge in a string of issues that have made this project such a joy!  

When I started working on this scene I considered doing some sort of step-by-step. Frankly I’m so sick of working on it at this point I want to just get it done! 

The multi-span bridge obviously needed a pier in the center. The prototype was stone (the stone abutments by my era had been replaced with concrete ones). I started with a Chooch pier but it was not only too big it was a “challenge” to cut the resin. Are these things Kryptonite? So my poorly cut Chooch pier went into the trash and looked for another solution. 


I dug a Walthers plastic concrete pier out of a box. The Walthers part and some of that Chooch flexible peel and stick granite made a passable result. Some paint and weathering and all was good. 

After the considerable enjoyment of hobby time to build the bridge itself out of Central Valley Truss bridge kit components, I installed the bridge deck, and abutments and stacked (vertically and horizontally) pink foam, installed the abutments, carved the foam to shape, added Cripplebush rocks as rock outcroppings, and a base “earth” texture. 

I dug out some half finished trees to determine how many I needed and roughly where they look “right”. There’s one or two spots where none of the trees really fit - I may twist up a couple of wire trees to fill the gaps. 

Next steps are static grass and other textures to the “open” areas and spending a couple of evenings this week in front of the television with the glue pot to attach the Super tree sprigs to the tree armatures. 

Apologies for the lack of depth of field in these photos - they are truly grab shots with my phone. 

Saturday, January 14, 2023

Central Valley Bridge Assembly Tips


I want to get the scenery completed across the "front side" of the layout - that means I need to tackle two big projects on either side of the support pillar. One of these is Main Street, the second are the bridges crossing the Missisiquoi River immediately to the right of the Junction scene. I'm using Central Valley bridges for the river crossing - I put together a short video sharing some tips on assembling these somewhat finicky kits:

Available on my YouTube channel:


Wednesday, November 24, 2021

Streeters Store update and more scenery

The next project is getting the scenery completed in the Sheldon Junction scene between the junction crossing itself and the large river crossing. Stic came over a few weekends ago and between the two of us we were able to make some cuts into the benchwork to plant the Streeter's Store. Like most South River kits this one can be built "at grade" - in other words on a flat piece of ground, or can be built to include varying levels of terrain. Obviously the latter is almost always more interesting, but it can sometime present a few challenges! In this case we had to slightly widen the benchwork and dig down into the plywood subroadbed. And naturally the logical spot for the store was directly over the legs to one of the IKEA Ivar cabinets....

Nothing a saw couldn't take care of though!

I turned my attention to finishing up some more details on the store. The South River kit includes the really old fashioned glass top gas pumps - they just seemed a little too vintage for my era so I replaced them with pumps more typical of the 1930-50s era. 

Still to come is some additional signage. 

Obviously the ground is strictly the base terrain - I'll add some tile grout "soil" shortly, as well as installing the road proper. 

The foreground tree is a placeholder for how - frankly I like how it frames the store so the tree may well grow roots!

I was thinking about adding a farmhouse across the street from the store (basically between the curved interchange track and the store in the overall photo). But when I added a house as a mockup it just seemed like one too many elements in the scene. 

The only other structure will be the Campbell water tank - that's one of the first "real" models I built and I've had it on every layout since I was a teenager. Thought I should include it here!


Saturday, September 25, 2021

One less siding, but better performance

If you want to find every place on your track that needs work, try running a brass steam locomotive over it. While today's diesel, and even plastic steam locomotives can run down a gravel road without a hitch, brass steam engines are the most finicky of all. 

I had one spot - a fairly broad curve - where the brass engines were all derailing (or stalling). Stalling is usually a power pickup issue - but derailing in this case was the fault of the track. 

I wanted to add a siding from the curve, and thought I was being clever when I bent a Micro-Engineering turnout to follow the curve, but I either didn't do it correctly or the brass engines were just a little too stiff to deal with the curve-into-tangent-into-curve-into-tangent arrangement. After thinking the matter through I decided the trains negotiating the curve reliably outweighed the benefit of having one more siding to set out and pickup cars.

Frankly while I fretted over this for a few weeks, but the fix didn't take more than a couple of evenings. The photos show a little more detail:


You can see the offending turnout at the top of the photo. Diesels, plastic steam locomotives, and cars went through it without a hitch. Brass steam locomotives not so much.


I pre-bent some Micro-Engineering flextrack to a curve so the new alignment would continue the same curve radius as the rest of the mainline. Note the difference between the old and new alignments.  


I covered the creamery building with a paper towel and then soaked the old track and ballast with water and alcohol mixture. After waiting about 10 minutes the track and ballast came right up. 


 A quick scraping with a putty knife removed any remaining ballast and dirt and leveled the roadbed. 


Laying the new track was a matter of pre-bending it to a constant curve radius (in this case 40", you can see the track radius gauge in place at the joint between two sections of track) and gluing the track in place with adhesive caulk. 


After the track was painted, weathered, and ballasted. I thought about moving the creamery track to the left as well, but I like how there's a gap between the main and the siding. Next step is static grass on this entire curve area and details like telegraph poles and the like. 


Friday, February 26, 2021

Pulling together the Junction Scene


The Junction scene can have some structures - but the prototype scene that's inspiring it was really in the middle of nowhere, with a few buildings clustered around the junction trackage proper. Temporarily arranging the structures shows the open air feeling of the prototype can be maintained with three or four buildings. More than that and it will quickly fall apart visually. 


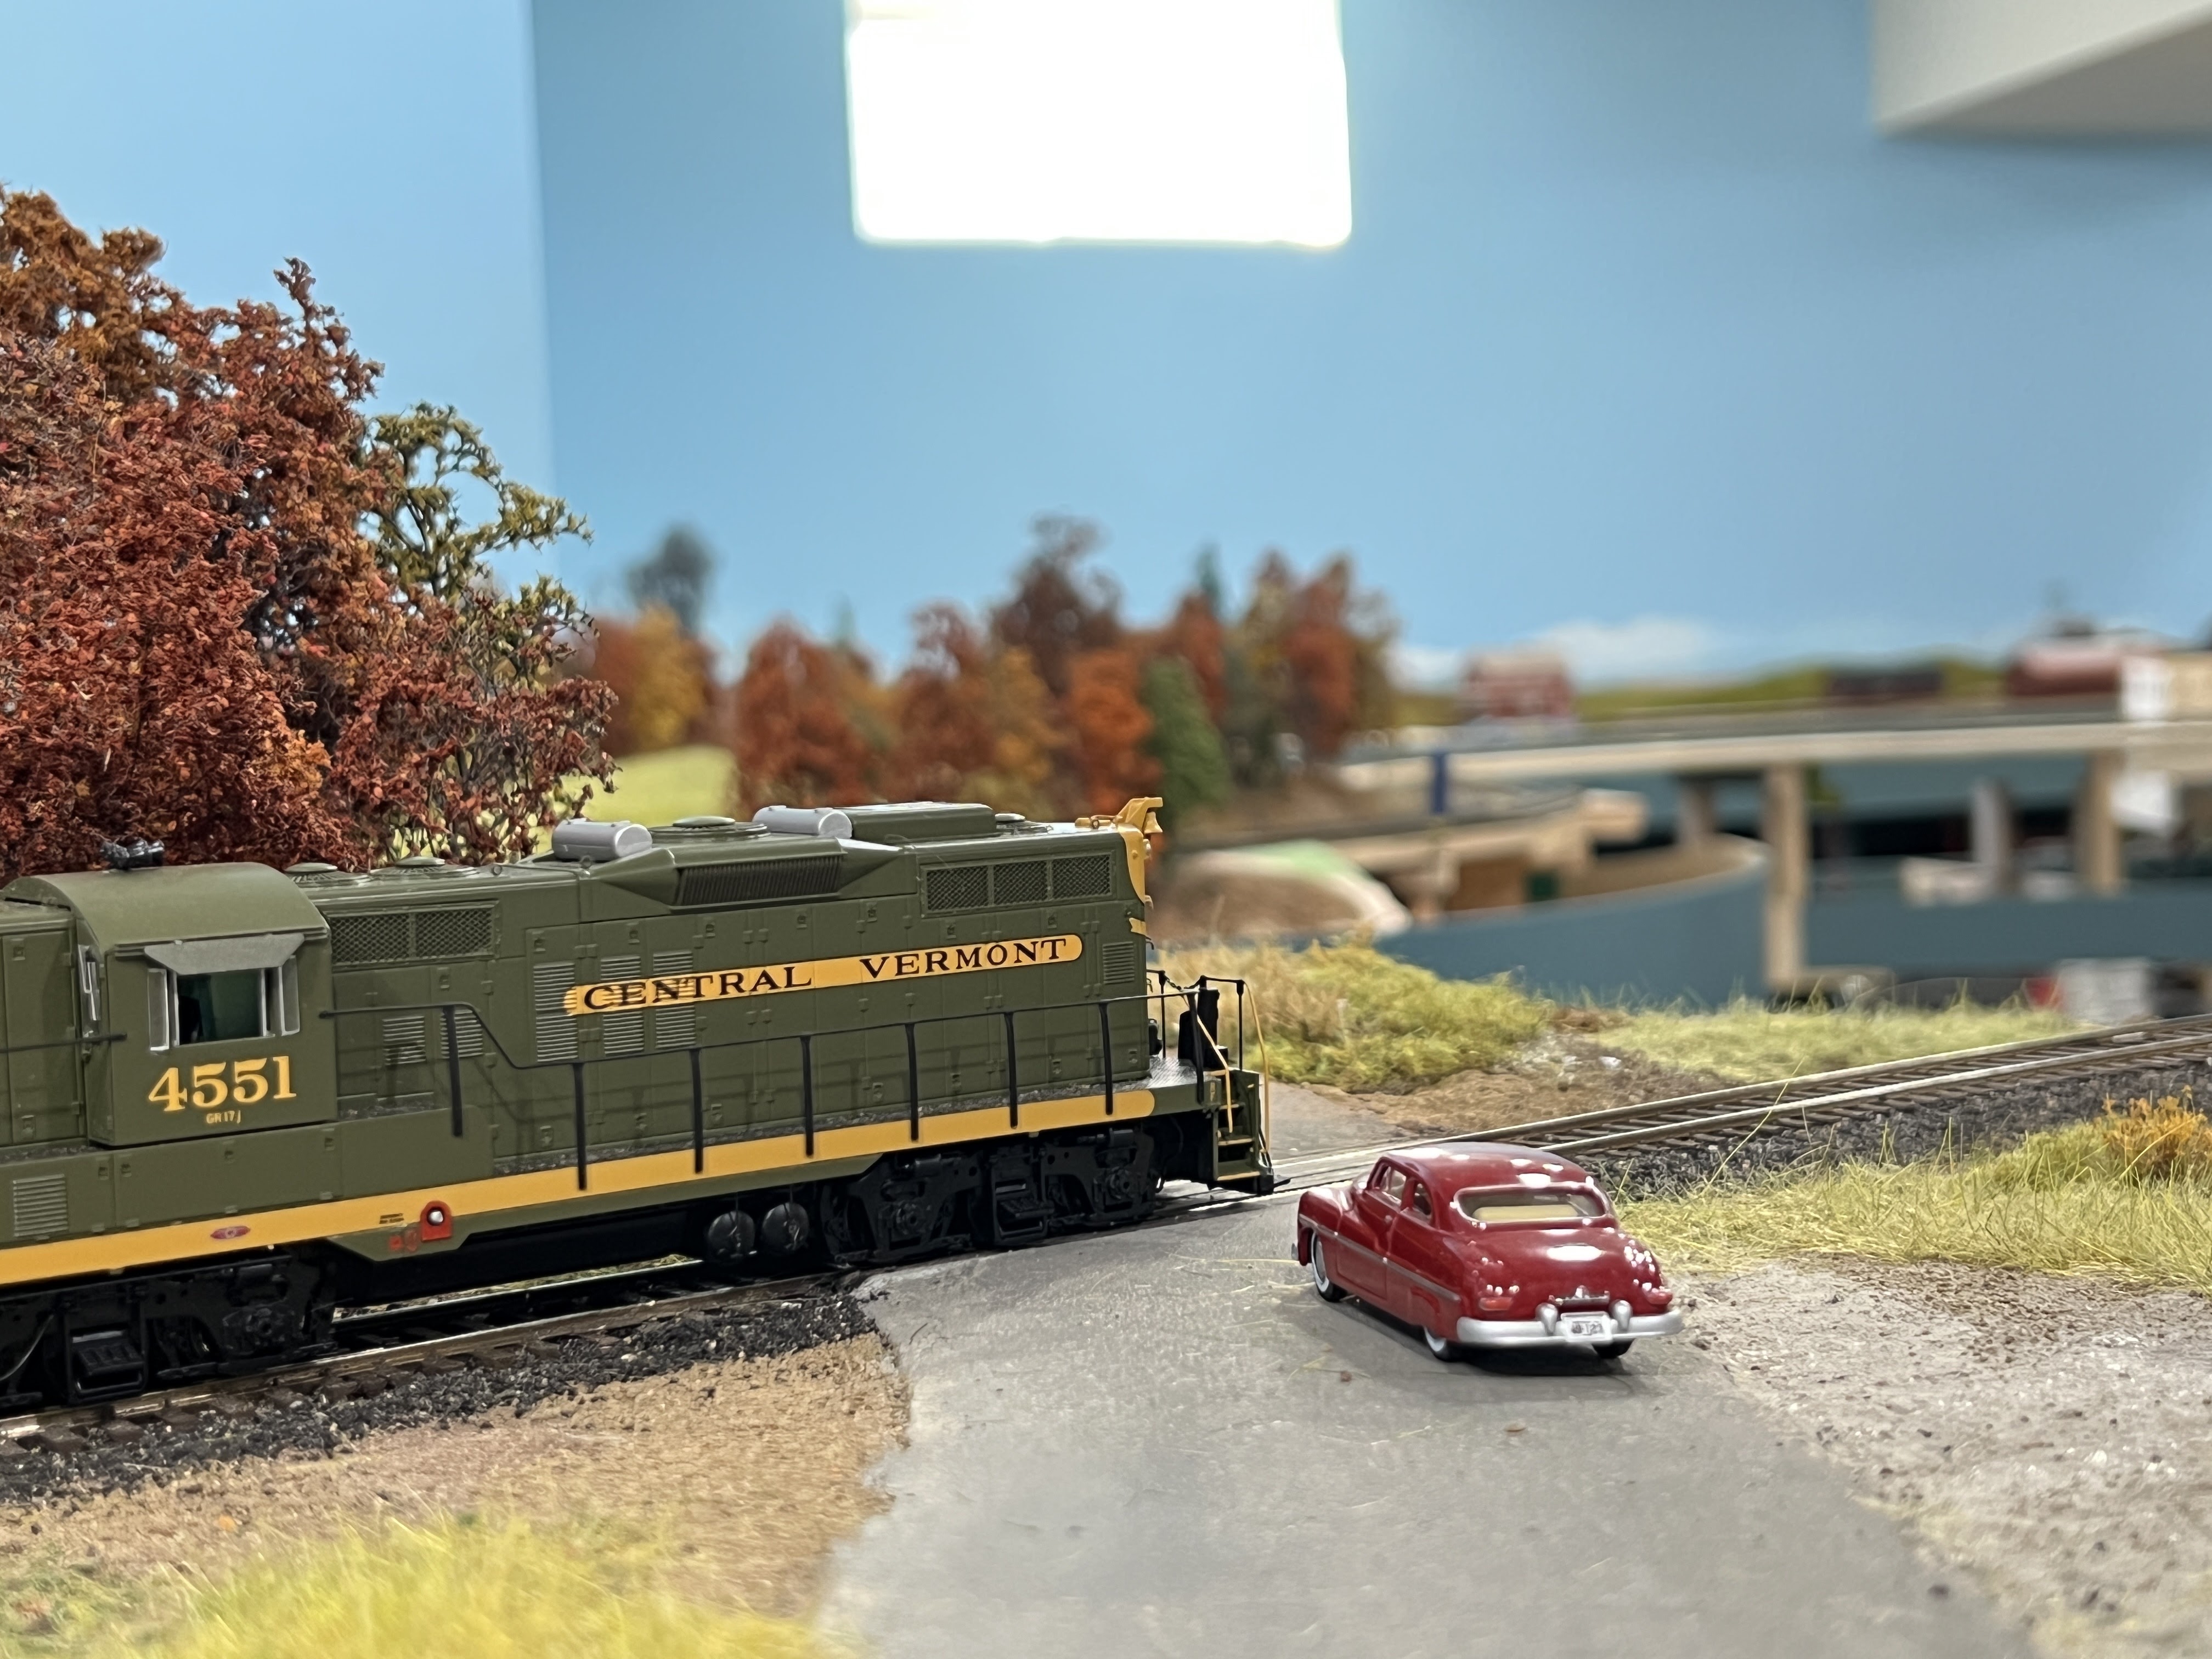
With the freight car catch up project completed, I've redirected my efforts to finishing up the Junction/River scene, based in spirit, if not entirely in fact, on Sheldon Junction, Vt. 

I've been making good progress on South river Model Works Streeters & Clear Brook kit, and have managed to get the store walls assembled, meaning I'm at the point in this project where I can start locating an appropriate spot for thing. One nice thing about this particular store is the fact that there is little or selective compression, meaning it's the size an HO scale country store should be, and not, as is often the case with a craftsman structure kit, more like an N scale building with HO windows!

A logical place for it seems to be some place between the bridge and St. J & LC crossing. 

Here's the prototype inspiration for my scene. Note the bridge to the left, behind the darker structure. 

I have seen numerous references to a store being located at Sheldon Junction - and though I'm not modeling the prototype exactly, including the South River Streeters Store doesn't seem like much of a stretch. I don't think the building in the b&w photo is a store - I think it may be an old creamery that has been converted to a residence. 

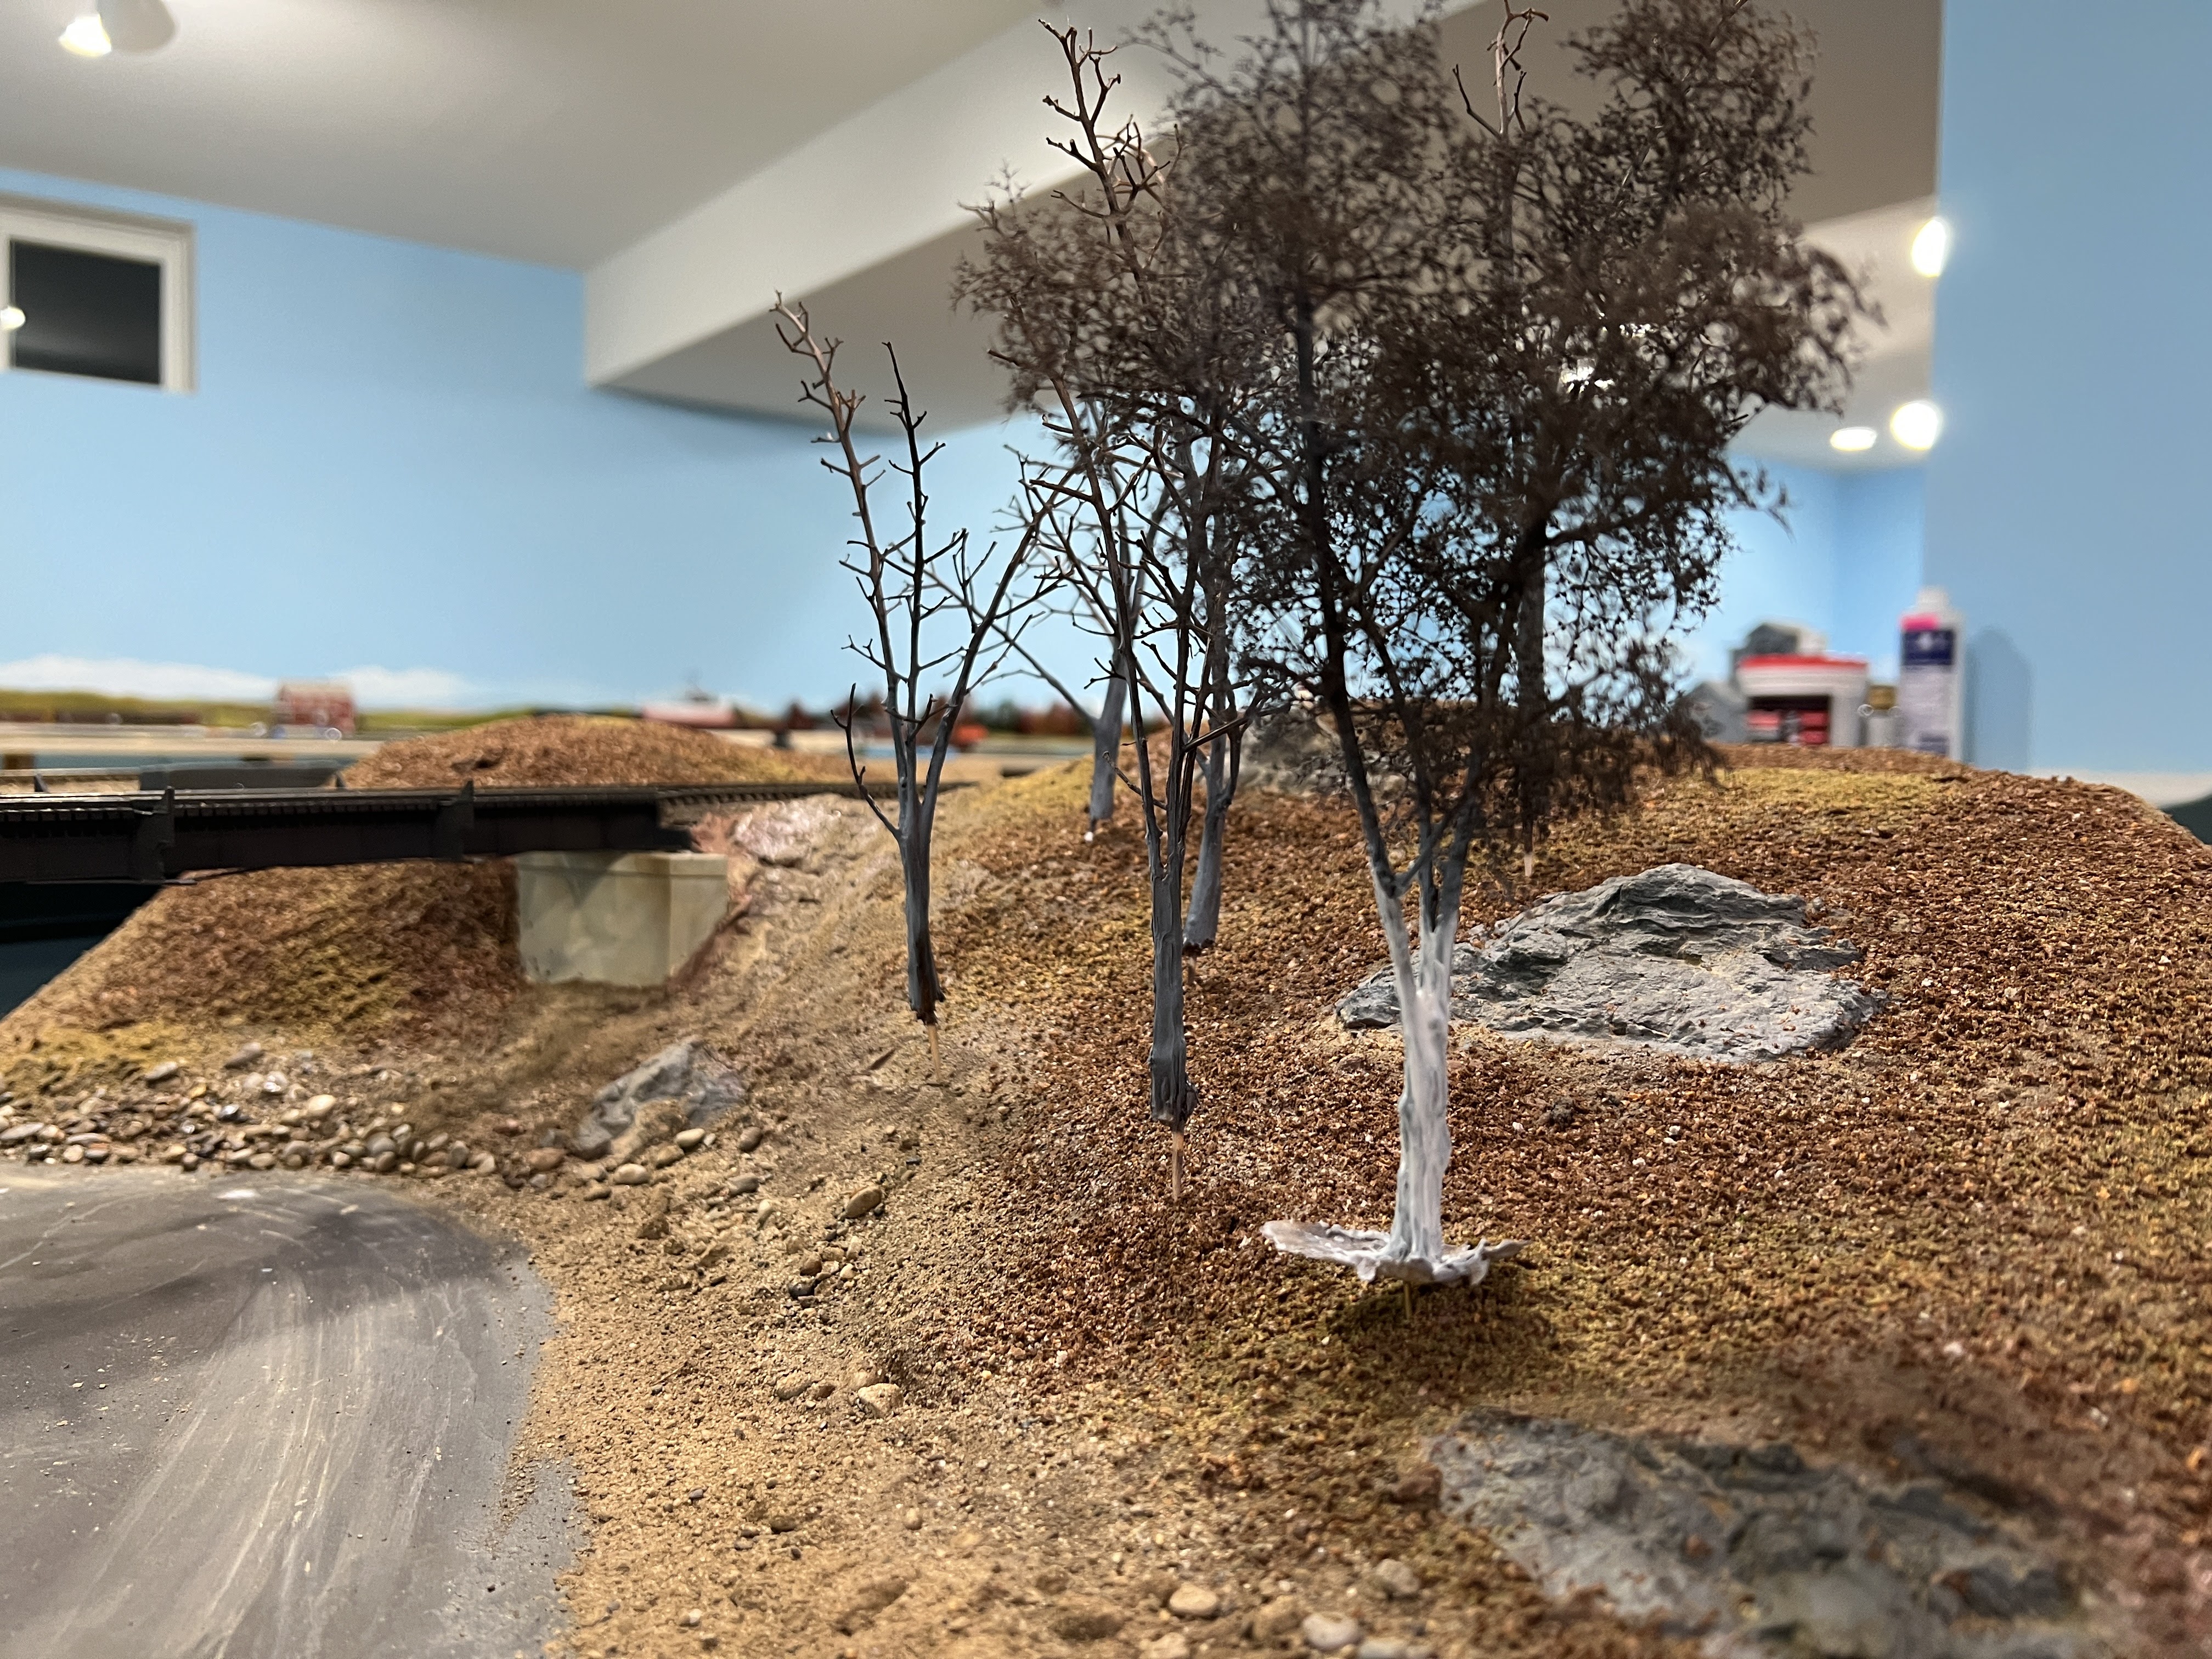
My plan was to place the feed mill that's part of the SRMW kit on the siding in the foreground (the one that dead ends in front of the St. J track by the crossing). 

Three issues: 

1. One of the neat things about the kit's feed mill is the way the rear shed addition is slightly downhill from the main part of the building. While the structure is designed to be built on either or a slope or flat ground, the slope adds a lot of character. Problem is the rear of the building would be at the St. J. track - meaning the ground would have to slope UP sharply to the meet the track. I think it could be done, but there's a river to the right - and the feed mill may very well end up below water level.  At best, the whole thing may look forced. 

2. I haven't assembled the walls on yet, but placing the foundation in position looks like to me like the building will just seem, well, small. 

3. This last one is really more aesthetic than practical, but the store and feedmill are shown arranged on a single diorama on the SRMW kit box. In other words, they go together. And that might not be a good thing. While most people won't know the difference, people familiar with these kits will instantly look at the scene and say "hey that's Streeter's from South River - I have that kit also...!" Not something I want to hear either from visitors - or from myself in my head. Seems the best way to prevent that is to not use the kits next to one another in a scene. 

This last item is of course the bane of kits when it comes to a prototype model railroad layout. You really do need to scratchbuild most, if not all, of the buildings if the goal is to get something realistic, and not merely artistic. 

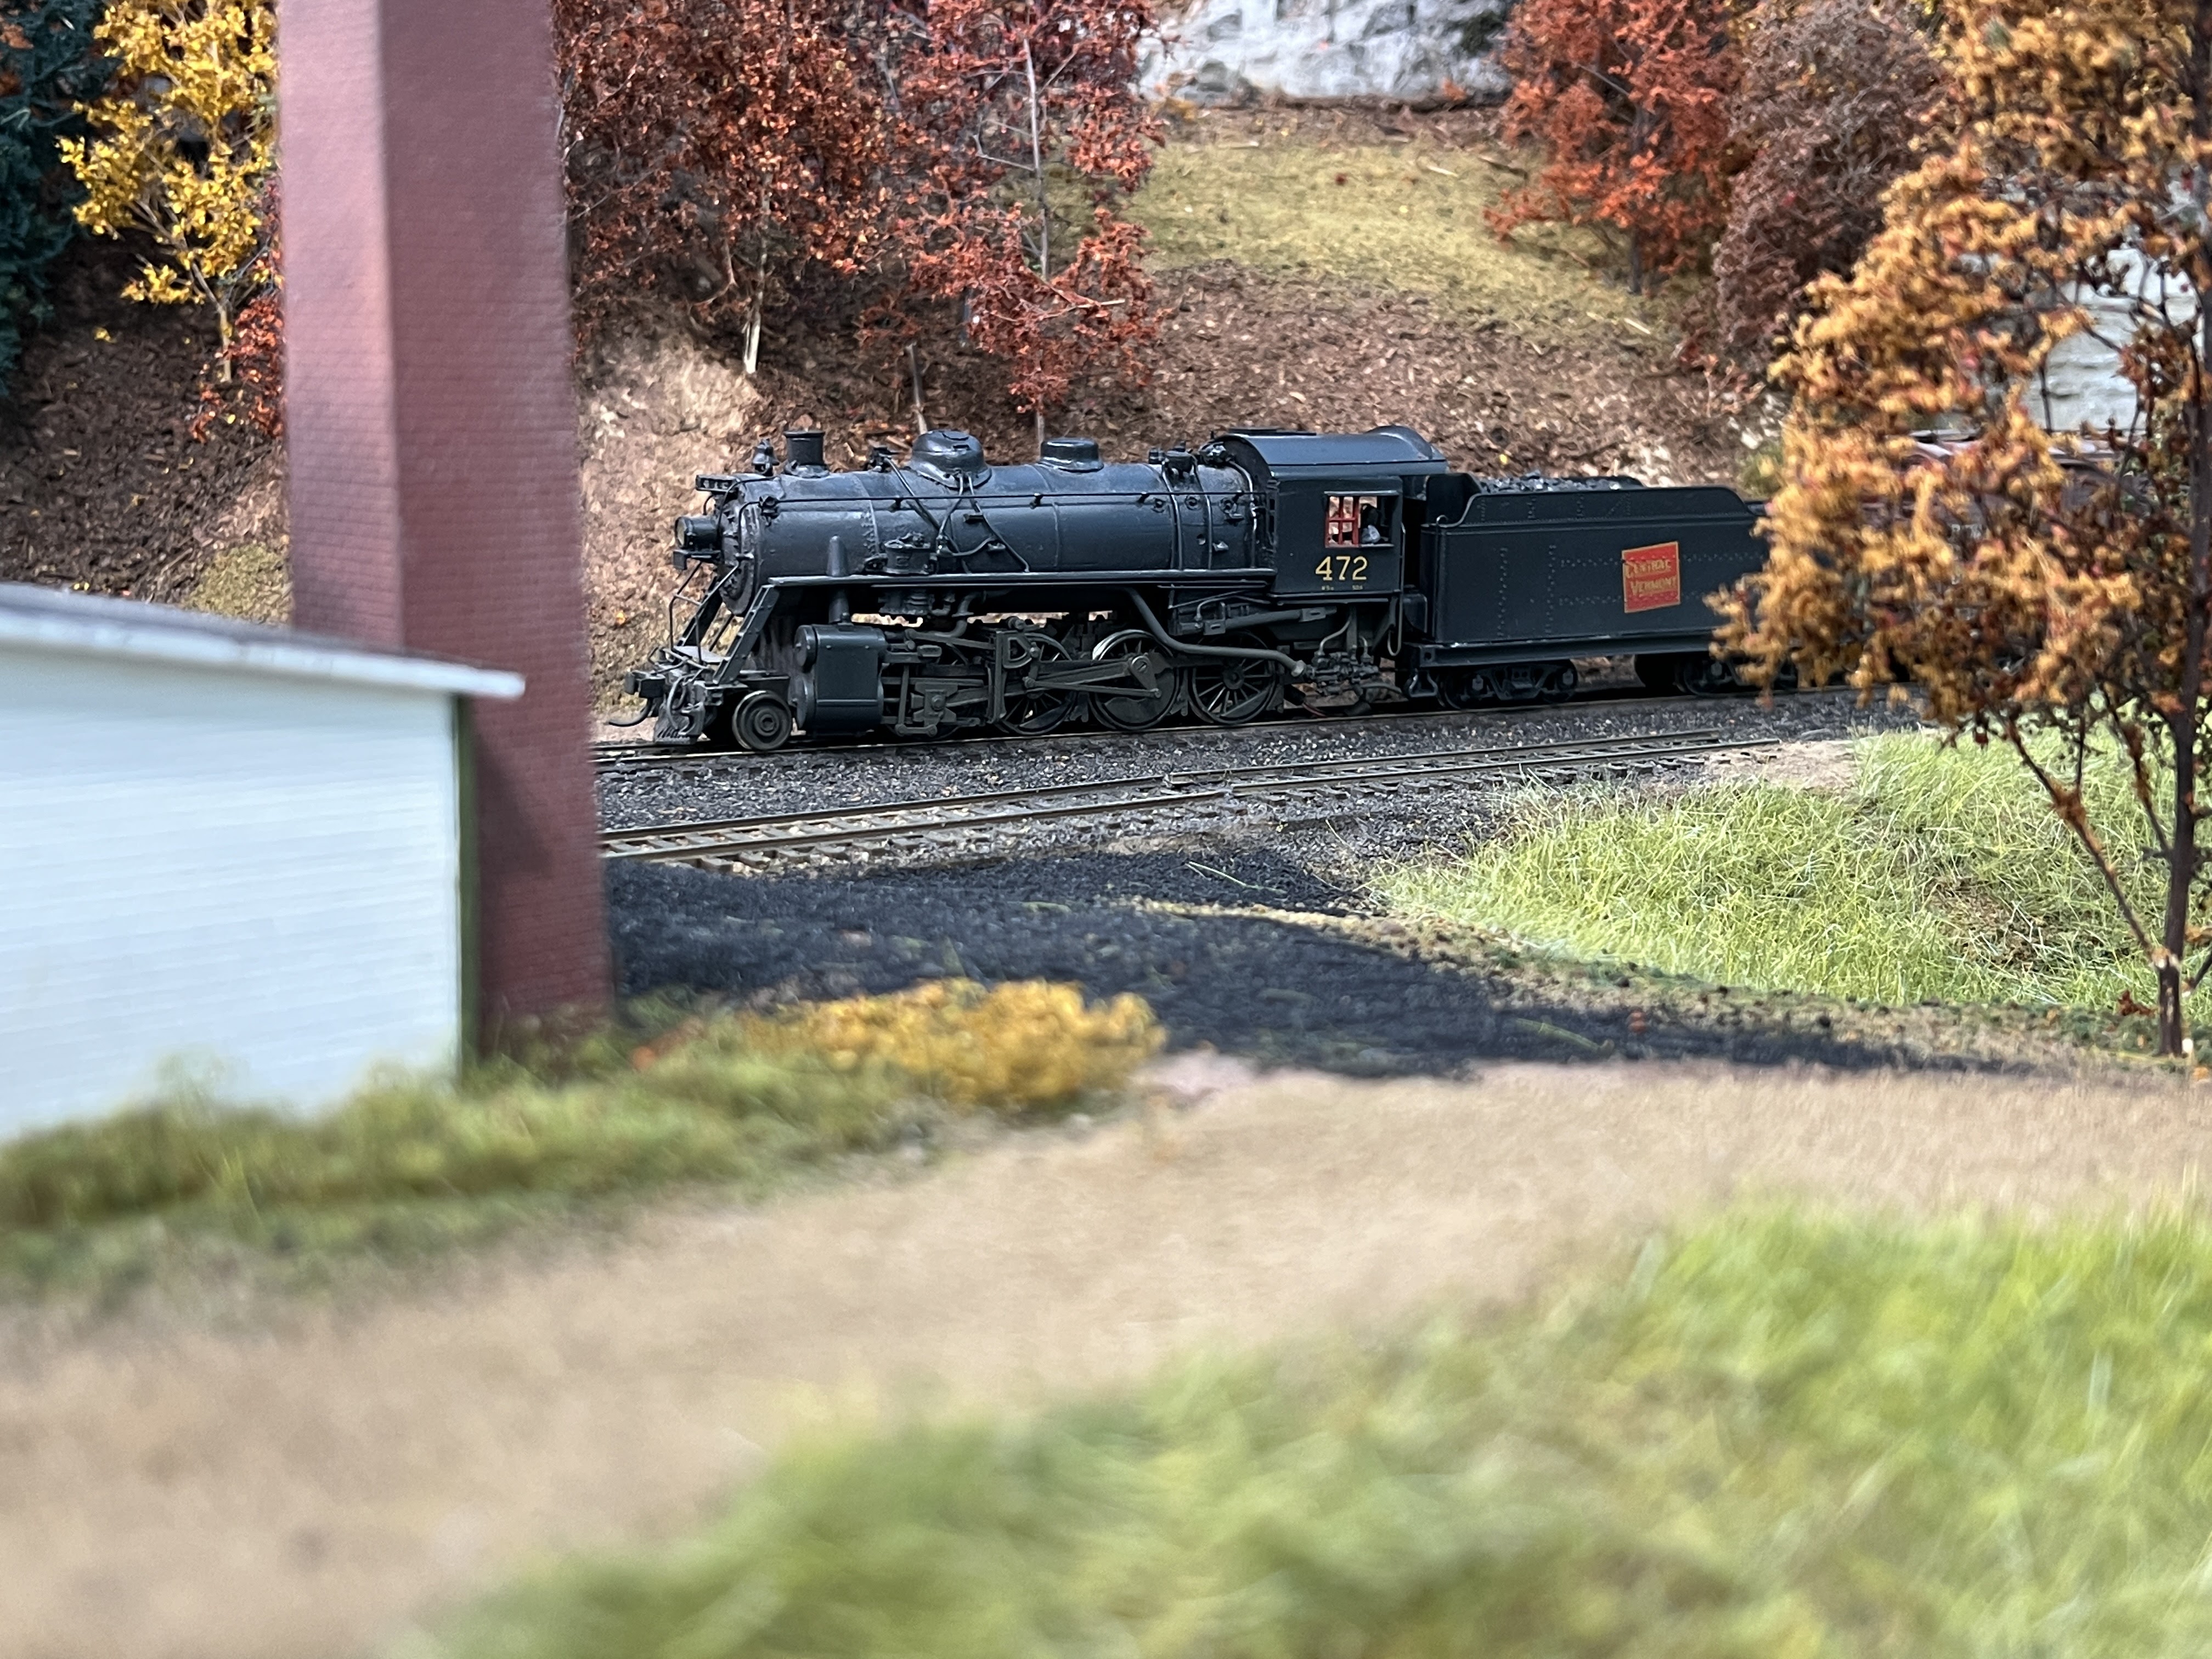
I do have a feed mill leftover from the old layout. It's based on a structure that once stood across the tracks from the Waterbury, Vt. station. It's prototype size, which means it looks like it can handle a car or two of feed a week. It's also finished, which is a rare commodity around here, and not one to be taken lightly. 

After playing around with several arrangements, the photo below seems to include the essential elements. The white house in the center of the photo is a stand in for the structure in the prototype shot. I plan to build a new model for this scene. Besides, I want something that's painted a color other than white - even if that "other" color is some form of barn red!


Saturday, December 5, 2020

Richford Branch Extra - Coming and Going - and notes on a side trip to Maine


This pair of Stan Bolton images, that I am sharing courtesy of Stan's good friend George Corey, show a pair of Central Vermont Consolidations (#s 465 and 466) working the daily local through Sheldon Junction, Vt., on an obviously "chilly" February 23, 1957. 

A few of the cars are fairly easy to identify (click on the image to enlarge). 

I'll go first - the lead car in the second image is a Central Vermont 40,000-series boxcar. Typically one of these cars was used to handle LCL on the Richford job. 

A side note:

Almost exactly two years to the day before this image was taken, no. 466 and her sister no. 471 were both sent to the Grand Trunk (NEL). No. 466 made exactly one trip - actually less than one trip - when she experienced mechanical problems on an Island Pond to Portland, ME extra and was promptly returned to the CV.  

No 471 faired much better than her sister on her assignment to Maine. She remained on the GT (NEL) through the end of August 1955 where she made 24 mainline trips, primarily on wayfreights. She even made a half dozen or so trips hauling passenger train no. 16, and spent 36 days as the Lewiston branch engine. 

Obviously the St. Albans shop crew fixed whatever ailed no. 466 and she's steaming pretty well in these shots.  


Thursday, December 5, 2019

Arranging roads and buildings in the Junction Scene

I spent some time playing around with building road/arrangements in the junction scene last night. While the scene is inspired by the crossing of the St. Johnsbury & Lake Champlain and Central Vermont in Sheldon Junction, Vermont, the buildings shown are all placeholders. And while I have some information and photos of the prototype buildings that were there, I don't really have enough to build accurate models so I think this scene is going to feature some sort of placeholders for a long time. 
Frankly, that doesn't concern me as the entire scene is fairly compressed and rearranged from the prototype - so the goal is to create something plausible that is appealing to look at. The overall photos show how things look. The depot, itself a stand-in, isn't a model of the Sheldon Jct. depot but is at least a "standard"" CV design. 
There are three spurs in the scene: 
One (the spur dead-ending at the edge of the layout in the background) is the St. J interchange track. This is hardly a high-density interchange, and will basically be a weed covered track. 
The second served a creamery (the white building in the distance)  
The creamery is an old Branchline laser kit that I have left over from the old layout (it actually goes back further than that). It's a creamery, I need a creamery there, so that's an easy one!
Two down, one to go. 
This is where it gets tricky. 
The third spur served at various times, a team track, feedmill, and a fertilizer plant.


I tried a finished kit for a cabinet making factory. It looks okay, but although a neat building in its own right, it really doesn't look "Vermont," at least to me. (Feel free to tell me I'm wrong!) 


The second building I tried is the low red building. This is certainly a Vermont building - as it's based on one of the buildings in a baseball bat and ski-manufacturing company in Waterbury (for a photo of the prototype structure see HERE. For even more detail on the Derby & Ball Co. click HERE.  
I'm strongly leaning toward the red building, perhaps with the addition of a shed or some such to actually serve as a warehouse or lumber storage building. 
The final possibility, and one I might chose based on expediency, is to add a gravel/dirt parking area and declare the spur to be a team track. 

Road Widths
The next thing I did was try to lay out the road(s) on the scene. Eventually there's going to be a large three-span bridge to the right - the road will serve as a logical transition point between the "junction" and the "bridge" portions of the scene. Besides, there was a road running across the branch between the junction proper and the bridge.... 

Someone on the one of the Facebook groups I follow asked a question about road widths as I was playing with the road arrangement so I took a couple of photos. Thought they might be of interest here. 
I lay out the shape of the road using some half strips of cork roadbed since it bends easily and I happened to have it on hand. The first photo (left) shows the road (between the inner edges of the cork) at 22 scale feet. It's not bad - but might make for some hair-raising episodes, especially on a moonless night! It's also going to look really narrow if you include shoulders, drainage etc.. on the sides of the road. 
The second photo shows the road at 26 feet - for the sake of 3/8" or so of additional width I think it looks much better and is what I would consider minimum for a two-lane country road. 


Some thoughts on road width before I step off the soapbox - 

1. You can de-emphasize how narrow roads are by avoiding placing vehicles next to one another in the traffic lanes (like in the photos here). 
2. City streets, especially in older towns in the eastern U.S., are often narrower than country roads - but don't make them too narrow. Main Street in Enosburg Falls, Vermont, hardly a city, is about 60 feet wide. Photos of old Vermont towns often show cars parked at an angle to the curb, two or three lanes, and more cars parked at an angle on the opposite curb. I've never seen this on a model railroad... 
3. Casual visitors - and even other model railroaders - may not know a thing about locomotives, freight cars, operations, and the like but I guarantee they will recognize a treacherous road when they see it!


Friday, June 30, 2017

Richford Branch Maps 3, Sheldon Springs

In between painting the basement walls and boxing up household goods I did manage to find enough time to draw up Sheldon Springs. Sheldon Springs is located west of Sheldon Junction (see the close up map here). Highlight of Sheldon Springs is the Missisquoi Pulp & Paper Co. plant, which is by far the largest single industrial customer on the Richford Branch. The first map is an overall view of the area and shows how the various elements fit together. (Click on the maps to enlarge).

The Missisquoi Pulp & Paper plant was located on a spur that swung northwest from the Richford Branch proper. The mill itself was located downhill from the CV tracks at the base of a fairly steep hill. The paper mill had a small switch engine (even had it's own engine house between the mill and CV main). But the CV did switch the mill, although CV engines couldn't operate past the points denoted with the red "B" on the diagram below.
Typically the Richford freight required two engines for power. George Corey provided this shot of N-5-a 2-8-0 no. 466 shoving on the rear end of the Richford-bound freight at Sheldon Springs on February 23, 1957. Within a month steam would be dead on the CV. (And yes, freight car nuts should check out the GTW rebuilt boxcar ahead of the van). 

Saturday, May 27, 2017

Richford Branch Maps - 2, Sheldon Junction, Vt.

We continue our trip up the Richford Branch with the location many consider the scenic highlight of the line - the bridge crossing the Missisquoi River in Sheldon Junction. This is milepost 10.11 on the line, measured from St. Albans. 
The word "Junction" in the name gives a hint as to the other key element of this scene, the CV's crossing with the St. Johnsbury & Lake Champlain RR, Vermont's famed "Covered Bridge" railroad. 
Again, this map was drawn using photos, valuation maps, and the railroad's engineering department drawings. 
(Click on the map to enlarge it.