Tuesday, August 10, 2021

More backdrops

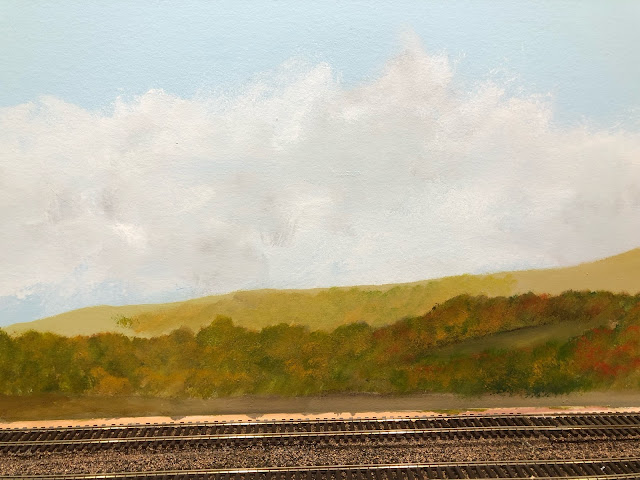
 Work continues on the basic scenery landforms around the staging yard. I managed to slice my finger pretty good with a box cutter - I attempted to slice a section of foam off a block while steadying it with my other hand - and let's just say that put a damper on any further progress that evening!

I've also managed to complete painting the initial base coat of the background hills along the long wall of the basement. 

Now that my finger is no longer throbbing I should be able to add the highlights to the backdrop trees. 

Here's a couple of photos showing some sections of the backdrop - sorry, no photos of the finger... 


Thursday, August 5, 2021

More backdrop and Kempinski Curve

I got some more backdrop painted yesterday - the image below (please excuse the mess on the peninsula!) shows a view of the backdrop from the main "viewing aisle" in front of the layout. 


This shot shows an aerial view of Kempinski's Curve (for the record there's been a "Kempinski's Curve" on SNE #3 and now #4....!) 

Longtime SNE fans may recall this tale of the design and construction of the famed helical tunnel on SNE #2:

"As you recall, last year the Company contracted with Colonel Niezgrabny Inzynier Kempinski to survey the route of the Southern New England from Tidewater to the Mashantucket Valley. This is, by all measures, considered easy country to accommodate a railroad line – with numerous watercourses and relatively low gradients – none exceeding 300 feet in a mile.
Therefore, I was as shocked as you were to learn that the Company had undertaken the construction of a major tunneling project. I was especially shocked to find Colonel Kempinski, lately of the Polish Army Corps of Engineers and a recent immigrant to our land, had commenced, with nothing more than a rough sketch on the back of a napkin, construction of a tunnel only slightly shorter than the famed Hoosac Tunnel with a constant circular curve. The net result is a linear run of mainline approaching 1.5 miles with the two portals within sight of each other on the same side of a low ridge separated by approximately 150 feet in the vertical plane.
My initial reaction was to sever all ties with the Colonel and send him back to his native Poland. Apparently the Polish Navy would like him to speak with him directly regarding his unique submarine door design (intended to improve air circulation, but at great cost).
However, after speaking briefly with the Colonel (through a translater as no one can understand his Polish or broken English) I believe more than a fair share of the confusion for this debacle lies squarely with our own Chief Engineer's failure to provide the Colonel with detailed surveys of the intended route. According to witnesses, the Colonel kept inquiring of the Chief Engineer "Gdzie jest mapa?, "Gdzie jest mapa?." Unbeknown to any Southern New England employee this means "Where is the map?" Our men thought he was looking for directions to the facility since he was frantically jumping up and down.
When one our younger employees said something to the effect "The Company is going around in circles" – apparently the Colonel's English is just good enough to take that statement as an indication of the intended route. So, we ended up with a tunnel that takes a lot of time to traverse and goes nowhere but up.

You'll also likely receive a communication from the Colonel regarding a tremendous personal injury he suffered when a large tunnel boring drill fell on his foot. His constitution is quite remarkable- I know of few men who can withstand the force of a 100+-foot long drill hitting their foot and continue working. But I assure you the Company bears no responsibility for loss or damages . . . what do you expect when you hire a guy to build a railroad who shows up wearing open toed shoes and who's name, roughly translated, means "clumsy engineer."


All kidding aside, I took a couple of quick snap shots of the curve area to see where and how many trees and other elements I need to position to effectively screen the view of the two staging tracks.  Here's an overhead shot (you can see the condensary building in place to the left) as well as eye level and track level views of the same spot. 


*(The quote above is one of a series of emails from my SNE Mailing List. But it's firmly rooted in fact - Bernie Kempinski and I did indeed build a helix without any complex drawings - or even measurements. And he did wear open toed shoes and dropped a rather large drill bit right on his foot. Luckily, it wasn't on the carpeted floor! And if the email above seems silly it's nothing compared to the Schneider's Row series of reports....)


Wednesday, August 4, 2021

Backdrop scenery for the staging "yard"

 I'm updating my "Modeling the October Scene" clinic for the upcoming MARPM in September. One thing I want to include in the clinic are some shots of the new layout. At the same time I'd really like to be able to stage some trains in my staging yard - so it makes sense to finish up the scenery along the staging yard "scene." 

The primary scenic element here is the backdrop. Most of the staging yard tracks (all two of them!) will be screened from view by a line of trees, bushes etc... a modified version of "Screened Staging" I used on a prior layout. 

Yesterday I dug out the backdrop paints and got a start on the backdrop behind the staging yard. 

At first I didn't like how "flat" the mid ground (tan) hill looked. So I experimented with adding some additional texture - you can see it if you look closely at the center of the hill in the photo below. Now I have to add that texturing to the rest of the hillside.  


Thursday, July 22, 2021

Streeters and Clear Brook Progress


Not a great deal of progress in the basement this week, but I did manage to get the feed mill (the "Clear Brook portion of the Streeters and Clear Brook kit) basically assembled and installed on its foundation. There's a metal sheathed warehouse addition that's not shown - it's currently in the paint booth drying!

Although I like the basic lines of this kit I find it, like most "craftsman" kits are really too overly compressed to justify rail service. At least this one doesn't have a lot of weird additions and oddball architectural elements - meaning that I may use it in town as a feed and farm supply store - it will just receives supplies via the team track and not a dedicated siding. 

Monday, July 12, 2021

Stone Retaining Walls


The Streeters kit includes several cast resin stone retaining walls. I had a few spare moments Friday afternoon so I decided to dig these out and finish them. 

I'd primed them with gray spray paint a few months ago. Since I model New England granite - or basically gray - seemed like a safe color choice. You could choose to start by priming them an earth tone color if you're planning a limestone or more of an earth tone. 

The goal is to have the individual stones look slightly different. At that same time avoid having the finished wall look like polka dots with each stone radically different than the others. I guess you could say you want the finished wall to have an overall similar tonal value. 

Starting with the primed gray castings here's the approach I used to give some color variation to the walls:

1. Brush on some gray and earth tone Pan Pastels on individual stones.  If some of the Pan Pastel gets on an adjoining stone don't worry about it - but do try to keep the each color to an individual stone. 

2. This step calls for a little finesse. Apply dark gray or black alcohol stain to each of the crevices between the individual stones. I used Hunterline "Creosote Black" but any alcohol stain will work. 

The stain will lightly soak into the Pan Pastels, and create even more color variation. 

3. Using a short stiff brush lightly - lightly! - highlight the top surfaces of the stones with a combination of light grays. Essentially you're highlighting the raised portions of each stone. It's very easy to overdo this effect, so go easy. I also suggest you avoid using straight white. 

4. A final step, which I will do after installing the walls, is to add some green to represent moss on the lower portion of the walls and any deep crevices and the like where moisture would collect. 


Saturday, July 10, 2021

A roof for the store at the Junction

 I finally ventured back into the basement a couple of evenings this week after a long hiatus from hobbies of any kind.  I found the Streeters store kit still sitting in the middle of my modeling desk - where it's been since February! - so it made sense to continue working on that. Besides, I need this building done so I can continue working on this scene. 

Besides, to finish the other ongoing layout project, scenery for the staging yard area, I need to make more Super Trees. 

Over the course of the last few evenings I got the roof on the store shingled. I also got the standing seam roofing cut to size and primed, but it still needs some more rust and texture. 

The standing seam roofing has been primed but needs some color variation and rust added. 

The photos show the current state of the structure. 

Couple of tips - I added horizontal guidelines to the subroof prior to adding the shingle strips. Actually I usually do this while the sub roof is flat on the table before installing it on the model. I didn't in this case. Did I mention I was a little rusty?

Another technique I tried is included in the kit instructions. Use a variety of markers to color the shingle material before removing it from the sheet and installing it. Basically, you draw lines across the sheet of different colors and shades of gray, tans, etc... and cut the sheets into strips and add them randomly. The results can be seen in the photos above. Much, much, easier and faster than the former method of installing the shingle strips and then coloring individual shingles on the roof after they've been installed. 

It felt good to get back at it - though I need to really clear off the modeling desk - and clean the workshop - sounds like a good plan for this afternoon!