Monday, September 19, 2022

Planning some foreground trees

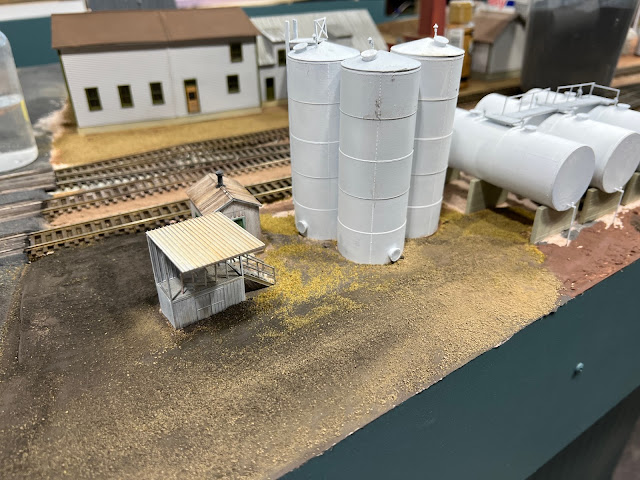
See how the building and track look as if they're "floating" in the photo above? They look as if they've been plopped on top of the world and are not really part of it. What can be done to fix this? 

I've become convinced that one of the best ways to truly "set" a scene is to include some scale (or near scale height) trees. I've also found that by placing scale height trees closer to the foreground you can create the same sensation that forced perspective creates. 

I made up the base armatures out of Crepe Myrtle tips (For more detail on how I build up these armatures see THIS POST, or search the archives for "Crepe Myrtle") but haven't yet put the finer branch structure or foliage in place. But I dug those out yesterday and played around with several of them to get identify the best choice for the area around Kempinski Curve. 

I think even with the "basic armatures" you can see how it "blends" the track, and the building to the left, into the scene instead of having them stick out. I'm hoping the finished trees, properly colored with smaller branches and some leaf texture will really set the scene - late fall in New England. 


Wednesday, September 14, 2022

Tile Grout Pavement - Create a Road to Somewhere...

Sanded tile grout pavement in place. Note the subtle variations in color and texture in the "older" pavement on the left. This was done by "stirring in" small amounts of darker and earth-tone grout when still dry.  

Since I built the basic benchwork going on three years ago, the town of Enosburg Falls, which is right up front when one comes down the stairs into the basement, has remained a partially scenicked, half done repository for stand in structures, surplus rolling stock and an assortment of tools and modeling supplies. And that's on top of the layout!

Getting the underside of the layout looking presentable was step one. The next item on the to-do list was to get the top of the railroad cleared off and at the very least ballast the track and install the roads. 

I won't elaborate on ballasting the track. I used pretty standard techniques. One thing I'll add about ballasting - a little ballast goes a LONG way, and too much ballast can reduce a well running layout to an engine stalling, derail inducing, mess. So when you ballast track use about half the ballast you think you need - and be especially careful with it around turnouts! 

I've tried all types of methods to make roads in the past. For smooth paved roads I think styrene may make be the best choice. But in this case I was looking to create an older, faded somewhat rough road. I tried Ceramic Stucco texture - which I've used with some success on building foundations - but that stuff is pricey. I also tried AK Interactive asphalt and concrete texture. I found the texture just a little too gritty for HO scale (it's great in larger scales) and if you think the artist medium like the Ceramic Stucco is expensive, just wait until you see the price for a very small tub of the AK stuff!


Oyster Gray - much lighter
than it appeared on the label.
 
I use tile grout as a base earth texture since it's easy to work with and inexpensive. I use sanded tile grout (for those who don't know, there are two basic types of grout - sanded, and unsanded). The sanded dries with a slightly gritty texture as you may expect. 

I went to Home Depot and ended up with two bags of sanded grout - one was a light gray color called Oyster Gray, the other a very dark gray (almost black) called Charcoal.  

Since neither color looked right I started combining them together. I worried I'd get a "salt and pepper" effect but frankly the stuff is fine enough that it really blended into a single color. 

About a 70-30 blend of Oyster Gray
 and Charcoal produced a faded
pavement color
.
 

Applying it is simple. I put masking tape to mark the width of the road and create a sharp transition from paved to unpaved areas. After mixing the grout to the desired color apply it dry to the area of the layout you want to pave. Then use a disposable foam brush to smooth the grout. I noticed the lighter gray grout tended to have clumps - these were easy to break up during the smoothing process. 

You can introduce subtle changes in the pavement color by manipulating the dry grout with the foam brush. You can also add more dark or light gray grout as desired. I even tossed a small amount of earth toned grout into the mix to warm up the pavement slightly. 

The last step is to secure the pavement in place. For this mist the grout with a mixture of alcohol and water (about 25% alcohol/75% water). Start with a gentle mist to "lock" the grout in place and then completely soak it. The next day it will be rock hard. 

In other news, I also started working in the basic landforms in the Berkshire area. Old magazines make great weights to hold the foam in place as the glue dries! 

And I've gotten most of the basic landforms in place around Kempinski Curve. It's ready for grass, foliage and some trees. 


Friday, September 9, 2022

More updates

In my update on Enosburg Falls I forgot to include a shot showing the Standard Oil dealer. The basis for this is the old Grandt Line kit - truly one of the most versatile structure kits ever offered in the hobby! The tanks need some additional weathering - I'm thinking a light wash to highlight the seams and perhaps some rust streaks. 

Another area where I did a little "tweaking" was in the East Berkshire area. There was one spot in this rural New England town where the railroad was four tracks across - the main, a double ended siding, and two spurs one in the foreground the other in the background. 

I opted to remove the spur closest to the backdrop, and  I may still remove the foreground one. Photo shows the turnout and spur removed. The gap ion the main track has since been filled!

Next step in this area will be to install the basic landforms in place, but I'm hesitant to hide my modern art painting on the plywood!  


Tuesday, September 6, 2022

Layout Update - Pre Open House Preps and Goodbye to a friend


This is a fairly long blog post. After not doing much of anything model railroading related for a few weeks, there's been a flurry of different activities going on in the layout room this past weekend. Not only do I want to get some of these items off the to-do list for the open house, spending some time in the basement definitely helped take my mind off another, less pleasant aspect of the last two weeks (more on that below). 

Stic came by and we finished up the final benchwork cutting and fitting for the rework of the paper mill peninsula. The recessed area in the foreground will be part of the mill race. We worked through the details of the track arrangement, sticking pretty close to the plan (seen HERE) although I did add another spur that ends at the mill race that I only recently noticed in a few prototype photos. 

The track is (obviously) temporarily positioned in this photo. I'd hoped to avoid hand laying a turnout but frankly the track will flow much better if I do so that's a big item on the to-do list this week. Goal for the MARPM open house is get the track in place, wired, and tested and the fascia installed. 


One easy task was getting a couple more roads paved. I smoothed out my custom blend of gray and dark gray (almost black) sanded tile grout using a foam brush, and soaked it. After it dried overnight it looked like older, faded asphalt pavement - exactly the look I was going for. 

In an old photo of Enosburg Falls there was a garage like building facing Pleasant Street just south of the tracks. There was also a small door at approximately boxcar floor height alongside the track. Somewhere in the past someone told me this was actually a small warehouse for a local lumber dealer. I cobbled up my version of the building in an afternoon. Behind the building, and along the tracks, there was a coal shed. It's shown here with the shed from MineMount Models McGuirk Coal kit. I may end up building a different shed for this spot, but the overall dimensions will be similar. I also cobbled up a coal drop for this lumber/coal dealer using some styrene sheet. 

The other ongoing project, which is going to take a while, is ballasting the track that's in place. I managed to get a lot of the track in Enosburg Falls ballasted yesterday. I'll simply keep the stuff needed to complete ballasting at hand and do a little bit every evening - perfect task for 15-30 minutes a day! 

**********************************************************************

Beauregard (Beau) 2008-2022

Anyone who's come to visit or operate on my layouts, watched my videos, or even followed this blog know about our Basset Hounds - Beauregard and Molly. We adopted them in 2008 when they were just shy of a year old and they've been part of lives - and my model railroading buddies - ever since. 

He lost his sight suddenly last winter but since he was a scent hound he recovered from that quite well - although he could no longer safely go up and down stairs. Then in May he starting suffering from repeated bouts of a canine version of vertigo that he frankly never really got over. This was compounded by other health issues more recently. While he was a real trooper until the end we knew in our hearts he wasn't happy and was simply fighting his best to stay around for us. And that didn't seem fair. Sadly, last week we made the gut wrenching decision to say goodbye to Beau. We miss him terribly and really haven't adjusted to not having him around. 

Every dog owner will tell you they've had one dog that they simply can't forget. And although I love Molly, Beau always was and will always be my "one truly special dog." 

The photo below shows Beau in the alert Basset position. Next to him is a pair of my dad's socks that Beau had liberated from Dad's suitcase. 

As my Dad described him years ago "He's not a dog, he's a clown wearing a dog costume!"