Pages

Thursday, December 26, 2019

Images from videos

Back 20 or more years ago an outfit called A&R Productions produced a series of VHS tapes titled "Central Vermont Railway in Steam." I bought the video tapes, and then, several years later the same footage was re-released on DVD. These were essentially 8mm and "Super 8" movies shot in the last couple of years of steam on the CV - primarily on the Southern Division. As such, they're not terribly clear - there's lots of handheld camera work and quick cuts, but they often show things that I've never been able to locate anywhere else. Which brings us to the topic for today. 
Video #3 is actually two parts - the majority of the first half of the video shows lots of switching in Palmer and Willimantic, and then shifts to a ride in the caboose up the Richford Branch. (The second half of volume #3 is a cab ride on the Willimantic sub in Connecticut). 
I was going through some boxes a couple of weeks ago and came across the DVD - which I haven't looked at in a number of years. I went ahead and popped it into the DVD player to see if there was anything useful to me. In short, there was. I did a few "screen captures" with my iphone - they actually turned out fairly decent - considering this was a DVD remastered from a VHS that was sourced from 8mm home movie shot with a handheld camera on a caboose that was bouncing around quite a bit. I've mentioned the Richford plywood plant (which burned in 1954) before - this is the only color image (and one of only a few views of any type!) of that plant I've seen, ever... 
Atlas Plywood in Richford, shortly before it burned to the ground in October 1954. 
Approach into the CV's Richford Yard
Another "only time I've seen a photo of ..." - the HP Hood Creamery in Richford.

In Enosburg Falls, that's a coal dealer shed in the right foreground. 

Enosburg Falls - note how tight this area was. Basically east of Main Street, West of Plesant Street. Feed mill, with a "Wirthmore Feeds" sign atop the roof barely visible to the left. 
Video features switching the Condensed Milk Plant at Enosburg (the gray building with all the windows). Pulling (above) and setting out new cars (below). Interesting this sequence shows CV milk cars - and B&M cars. 


Monday, December 23, 2019

End of Year Progress Report

I'd mentioned in a previous post that we were having a holiday open house for our neighbors. Happy to report the event was a complete success. It's always interesting to see the reaction of non-modelers to a scale model railroad. A lot of people mentioned they'd expected to see a train around the tree, or perhaps a Christmas Garden* - instead when they came downstairs they saw, well, this.... 
I managed to add some initial scenery to the front corner by the entry to the layout area prior to our open house. I'm happy to report that the trees that were carefully packed up by my father close to two years ago survived the move and storage. 
Take this as an end-of-year report on the status of the Richford Branch. 
I placed the cannery in the front entrance area. The structures, such as the barn in the background and the various buildings visible in the previous photo, are stand-ins. 
The stationary end of the swing gate
 showing the slot the gate slides into. 
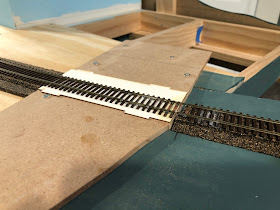
 The entire mainline "loop" is in place, including the swing bridge track. The photos show how it's constructed and how it works. Essentially, the swing gate surface slides beneath a piece of mdf that's secured to the plywood subroadbed with a gap between the underside of the MDF and the layout frame. 
Action shot! The end of the swing gate. Note the
paint scrapes indicating the friction lock.
 
To date friction does a fine job holding the track in place. At some point we'll add some sort of locking mechanism and a perhaps an electrical interlock to kill power when the bridge is open. 
Closed position. I soldered the rail to
some PC board ties on both the gate
and the layout to help keep the rails aligned. 
The trains ran just fine over this bridge for more than 4 straight hours - so I consider the swing gate a complete success. 
With the mainline in place and operating, I've turned my attention to the two peninsulas - the papermill peninsula and the Richford peninsula. 
A set of Fast Tracks twist ties glued to a piece
of 1/8" plywood to form the lead into the paper mill yard. 
After playing around with flextrack for an afternoon, it became obvious the paper mill
 peninsula would benefit from a handlaid turnout or two. Besides, I continue to have issues with ME turnouts, meaning I might be handlaying all the turnouts on the two peninsulas.
I also have been laying out the track for the Richford yard. But that deserves it's own blog post. 


Friday, December 20, 2019

Nine Years of Blogging

December 17th marks the ninth anniversary of this blog. In keeping with what has become a blog anniversary tradition, here are a few numbers, going back to December 2012 (first month I actually took notice of these statistics!).
I started this blog to create a diary of sorts that would document the building, rebuilding and operating my home layout. I did take a break from the blog between January-May of this year, but have resumed in the last few months. 
One thing I did this year was resume video updates on the layout. I didn't do one for November, but managed to record a November/December update that I hope to get edited and posted this week.  
I'm surprised, thrilled, and more than a little humbled at how many people following (and I hope enjoy!)  my little corner of the model railroad internet. 
As of today, there's a total of 719,448 unique page views!
Based on the typical number of reads per year, I don't think the blog will crack the million view mark in 2020, but you never know!
 The top all time posts** are shown below:

* There are no stats available for the first year since I didn't include them in the first anniversary post! I also didn't do a "End of 2018" Anniversary post for some reason. 

** Of course, by including the list of Top Ten posts and associated links here all I've done is guaranteed people will click on them, increasing their total views more!!

Tuesday, December 10, 2019

Farewell to White River Junction

Back in August I received the following email: 

"Hello Marty.

Don Janes and George Dutka visited my B&M-CV layout yesterday and in the course of the discussion they said you had several (?) models of White River Jct. structures, but thought you had moved away from modeling the CV and/or WRJ and might be interested in selling some of these structures. Specifically, they thought you had a model of the WRJ Union Depot. I would be particularly interested in that - but other structures reflective of WRJ as well.

I live in Imlay City, MI, but my daughter lives in Bethesda, MD; so, I get to your "neighborhood" a couple times each year.

Let me know if you are interested in placing any of your models in a good home. - Bill Moore"


The White River Junction station, ball signal and shack, all built by Rich Cobb, on the old CV Roxbury Sub. 
I wrote back and told him that I did have models of the station, the ball signal and shack, and the Twin State Fruit Warehouse, all of which he was interested in obtaining for his layout. I didn't hesitate for long before emailing Bill back and telling him I was willing, and ready, to part with the models. They weren't doing me, or anyone, any good sitting in boxes and I don't have any plans to model WRJ at any point in the future. I'd rather have them go to good home where they would be appreciated.
And Bill's layout is shaping up to be a fine home for these, or any models, indeed. For a virtual visit to Bill's layout that George Dutka included on his blog, click HERE.
In short, Bill and I made arrangements for him to take delivery of the White River Junction structures the weekend before Thanksgiving when he and his wife were in the area visiting their daughter. We had a pleasant visit with Bill and his grandson when they stopped by. 
I look forward to seeing the structures in place on Bill's layout. 


Thursday, December 5, 2019

Arranging roads and buildings in the Junction Scene

I spent some time playing around with building road/arrangements in the junction scene last night. While the scene is inspired by the crossing of the St. Johnsbury & Lake Champlain and Central Vermont in Sheldon Junction, Vermont, the buildings shown are all placeholders. And while I have some information and photos of the prototype buildings that were there, I don't really have enough to build accurate models so I think this scene is going to feature some sort of placeholders for a long time. 
Frankly, that doesn't concern me as the entire scene is fairly compressed and rearranged from the prototype - so the goal is to create something plausible that is appealing to look at. The overall photos show how things look. The depot, itself a stand-in, isn't a model of the Sheldon Jct. depot but is at least a "standard"" CV design. 
There are three spurs in the scene: 
One (the spur dead-ending at the edge of the layout in the background) is the St. J interchange track. This is hardly a high-density interchange, and will basically be a weed covered track. 
The second served a creamery (the white building in the distance)  
The creamery is an old Branchline laser kit that I have left over from the old layout (it actually goes back further than that). It's a creamery, I need a creamery there, so that's an easy one!
Two down, one to go. 
This is where it gets tricky. 
The third spur served at various times, a team track, feedmill, and a fertilizer plant.


I tried a finished kit for a cabinet making factory. It looks okay, but although a neat building in its own right, it really doesn't look "Vermont," at least to me. (Feel free to tell me I'm wrong!) 


The second building I tried is the low red building. This is certainly a Vermont building - as it's based on one of the buildings in a baseball bat and ski-manufacturing company in Waterbury (for a photo of the prototype structure see HERE. For even more detail on the Derby & Ball Co. click HERE.  
I'm strongly leaning toward the red building, perhaps with the addition of a shed or some such to actually serve as a warehouse or lumber storage building. 
The final possibility, and one I might chose based on expediency, is to add a gravel/dirt parking area and declare the spur to be a team track. 

Road Widths
The next thing I did was try to lay out the road(s) on the scene. Eventually there's going to be a large three-span bridge to the right - the road will serve as a logical transition point between the "junction" and the "bridge" portions of the scene. Besides, there was a road running across the branch between the junction proper and the bridge.... 

Someone on the one of the Facebook groups I follow asked a question about road widths as I was playing with the road arrangement so I took a couple of photos. Thought they might be of interest here. 
I lay out the shape of the road using some half strips of cork roadbed since it bends easily and I happened to have it on hand. The first photo (left) shows the road (between the inner edges of the cork) at 22 scale feet. It's not bad - but might make for some hair-raising episodes, especially on a moonless night! It's also going to look really narrow if you include shoulders, drainage etc.. on the sides of the road. 
The second photo shows the road at 26 feet - for the sake of 3/8" or so of additional width I think it looks much better and is what I would consider minimum for a two-lane country road. 


Some thoughts on road width before I step off the soapbox - 

1. You can de-emphasize how narrow roads are by avoiding placing vehicles next to one another in the traffic lanes (like in the photos here). 
2. City streets, especially in older towns in the eastern U.S., are often narrower than country roads - but don't make them too narrow. Main Street in Enosburg Falls, Vermont, hardly a city, is about 60 feet wide. Photos of old Vermont towns often show cars parked at an angle to the curb, two or three lanes, and more cars parked at an angle on the opposite curb. I've never seen this on a model railroad... 
3. Casual visitors - and even other model railroaders - may not know a thing about locomotives, freight cars, operations, and the like but I guarantee they will recognize a treacherous road when they see it!


Monday, December 2, 2019

Overdue Updates and Open House Preps

 It's been a couple of weeks since I last posted an update - 
1. Benchwork: All the layout framework and fascia are complete. And the fascia has been painted with two coats of "Riverway" - the same dark gray/green that's painted on the walls beneath the layout. 
2. Trackwork: The mainline loop is complete, in, and operational - including the track across the swing gate. Roadbed is in place on the paper mill peninsula, and I've been finalizing the track arrangement on the large Richford peninsula. 
3. Structures and Scenery: I will do a separate post to show the latest on the Farm Implement dealer to continue that series of posts. And while there's no progress to show on scenery as of yet, I have been positioning some structures, mostly leftovers from my previous layout, in various spots. Some of these will be permanently installed, others will serve as placeholders - helping to get the layout to a "finished" or semi-finished state for our open house later this month. 
Yes, the first public showing of the layout will be later this month. The event is a neighborhood holiday open house. The stated purpose is to show off the Christmas decorations in the houses around the neighborhood, but everyone, and I mean everyone, has heard about the "train set up" in our basement. Even people we've never met. So we fully expect we're going to get a bunch of visitors who won't even glance at the decoration upstairs as they make a beehive for the basement! 
I will try to do a video update at some point in the near future, but frankly "getting the layout ready for visitors" is the top priority!


Monday, November 18, 2019

"Agricultural Implement & Paint Dealer" - Part 4 - Test fit of Garage Doors and basic assembly

Before assembling the walls, I test fitted the garage doors. For the large windows above the two smaller garage doors I started with a Tichy storefront window casting and added some 1x3 strip to create a frame for the window. I also added a center post between the two upper windows. 
Once I was satisfied with the fit of the garage doors I assembled the four exterior walls.
 
I had some 90 degree corner braces (I think they're from City Classics, but I'm not positive) so I used one in each corner, positioning them so they wouldn't interfere with the windows or roof. 
Next step: the angled front door for the "Paint Store" section of the building. 

Friday, November 15, 2019

"Agricultural Implement & Paint Dealer" - Part 3 - Front wall and Garage Doors

With the attic refinishing project complete (that's a whole other story) I finally had a chance to turn my attention back to the Enosburg Falls implement dealer. 
The first thing I did was adjust the front facade of the building to match the prototype photo I have showing how the large overhead doors were arranged before they were boarded up at some point in the 1990s. (See this photo)
This required cutting one new opening in the front wall and enlarging the opening with the two smaller doors. As I was enlarging the door openings, I made sure to allow enough space for the two windows above each smaller door. 

Before I cut the openings, I tried to find commercial garage door castings that would work. Everything I found in my stash of gas station kits and plastic doors were either too short, too wide, not tall enough, or too tall. Scratchbuilding was the only option. 
I tried two approaches to the garage doors. For the taller single door, I started with a piece of Evergreen .015 clear styrene, cutting it slightly larger than the opening to provide a surface to attach it to the door opening from the inside. Then I added styrene strip for the vertical and horizontal portions of the door. A coat of white paint - being sure not to get any paint on the window "glass" completed that door.
For the two smaller doors I cut a rectangle of .015 styrene wide enough to accommodate both doors and the center post between them. 
Then I cemented the trim strips to the styrene base. The vertical trim was fairly straightforward, the horizontal trim pieces were installed overlength and then trimmed to fit with a fresh razor blade. 

One everything dried, I carefully cut out the door openings and filed them square. After painting, I'll add clear glazing to the windows. 
I can't say I like either of these approaches better than the other - if you needed a door painted a color other than white, I suspect the second approach might be a little easier. 
One thing I do know - it was far easier to scratchbuild these than the two or three evenings I wasted trying to find a ready-made solution. 

Wednesday, November 6, 2019

Wordless Wednesday #216

Jack Delano,1941, Library of Congress

Wednesday, October 23, 2019

Wordless Wednesday #215

Richford??? I'm pretty sure this one is mislabeled!!

Friday, October 18, 2019

Swing Gate v1.0

If you looked at Video Update #6 you saw a live demonstration of the swing gate. Actually, the gate in the video wasn't quite complete - so in the interest of full disclosure here are some photos showing that it is indeed more than just a "piece of plywood and a couple of hinges..."
The underside of the plywood "bridge" is braced along most of its length by a plywood brace. Note how the brace gets thinner as it gets further from the hinges - an attempt to minimize sag and at the same time minimize the pressure on the hinges!
That plywood brace is itself strengthened by a couple of pieces of 1 x 2 arranged in an "L".

The hinge end with the bridge in the open position shows the hinge arrangement - nothing fancy here, I told Stic to just be sure everything was really sturdy! I think there's two boxes of screws holding this thing together!
This shot shows the swing gate in its fully open position - it opens up enough to touch the fascia on the layout. 
Next trick is to figure out how to get the track in place. Stic tells me that's my problem. 
Thanks to Stic Harris for his help with this project, and with all the various thankless tasks I always seem to assign him! 
Today also happens to be his 50th birthday. He's taking a well-earned respite from model railroading to enjoy coastal Maine with his lovely wife. And he's officially joined the ranks of those us who complain we're too stiff, sore, or otherwise impaired to work on top of or under our layouts!


Thursday, October 17, 2019

Video Layout Update #6

Just released on my YouTube Channel!

A video update on the Richford Branch layout - including the chance to see Stic Harris conduct the first "walkthrough" of the swing gate. 

Plus some other stuff. 

What else could you possibly waste 5 minutes and 41 seconds on? (don't worry, it's not Stic the whole time....)

Just click HERE to go directly to the video. 


Friday, October 11, 2019

Just about reached the end ...

I've started to experiment with photo backdrops. Yes, I plan to trim it to the ridgeline and not have the white borders on the final backdrop!
... of the woodworking phase of layout construction! 
Two significant (at least to me) accomplishments in the model railroading realm this week. 
First of all, I'm happy to report that the significant benchwork construction is (at long last) completed - that means all the subroaded and fascia has been installed, See below for an overall view of the layout:


At this point the only construction left is to complete the swing gate and install a couple of shelves in some key locations. The shelves will prove useful for a place for visitors and operators to put their beverages - oh yes, and in case we ever operate the layout formally there'll be a place to store throttles and paperwork and the like that isn't the surface of the railroad!
There's still some track laying left to complete - primarily on the two peninsulas - the shot below shows the CV yard in Richford - obviously it's awaiting roadbed and track!
The other thing I finished was a clinic on the layout that I just presented at the NMRA Mid-East Regional Convention in King of Prussia, Penn. For those keeping score, this is actually the second all new clinic I developed in the last 6 weeks - I'm hoping that this one will be a layout progress clinic that I can regularly update. I'd like to get as much mileage out of this as possible! 
The clinic was well received despite the 10 o'clock start time (that's 10pm!) and some issues getting my computer to talk to the projector. 


Wednesday, October 9, 2019

Friday, October 4, 2019

Progress 2 - The Sequel

It's like seeing an old friend. The turntable is a Diamond Scale kit built for my Locomotive Servicing Terminals book, circa 1998 or so. It's the last remaining physical remnant of SNE #1, and is being recommissioned to serve as the Richford turntable.  
As I mentioned in a previous post, I had high hopes for completing the "major" benchwork construction this past weekend. And, though I made some significant progress on what will be the Richford peninsula, I didn't actually finish it. 
Frankly I spent way too much time figuring out how to support the turntable "module". In reality, this is the old Palmer turntable mounted to the same piece of plywood I cut from SNE #1 when we moved out of the Oconomowoc house. Getting it level, lined up, and supported took the better part of last Sunday afternoon. 
I managed a fair amount of time on the layout a couple of evenings this week - so I'm very close to getting the benchwork on the Richford peninsula checked off the to-do list. 
Hope springs eternal to get this task completed this week. In the meantime, here's a photo showing the current state of the Richford peninsula. 


Tuesday, September 24, 2019

Progress?

The only way to finish a project like fascia is to keep
plugging away at it one piece at a time. 
The clinic at MARPM seemed pretty well received - and I was pleasantly surprised at the number of people in the audience - especially when the show organizers saw fit to put me on opposite Paul Dolkos for both of my "performances" <g>!
Frankly prepping the clinic meant all kinds of half-finished (half started) projects now litter the modeling desk. 
And, preparing for the clinic meant there was virtually no progress on the layout itself for the last month and a half. 
I really need to focus on my next clinic, which will be a layout status report/update at the upcoming MER (Mid-Atlantic Region of the NMRA) Convention in mid-October. 
But first, one thing I'd really like to get completed sooner rather than later is the "woodworking" phase of construction. To that end I spend some time Sunday and the last two evenings away from the modeling desk and the computer and have been making sawdust. 
The only benchwork and fascia remaining at this point are the Richford peninsula. The basic L-girders and joists are in installed - meaning I have to mark and jigsaw the subroadbed, attach all that to risers, and install the fascia. 
I think I can get those done by the end of next weekend. I might even manage to get a coat or two of paint on the fascia. 
Once the heavy sawing is done I can at last thoroughly clean the utility room area which has served as the "sawmill" for the last six months or so. Truth be told, I'm looking forward to getting that place cleaned up almost as much as getting the benchwork finished!

Monday, September 23, 2019

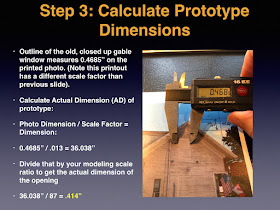
Estimating Dimensions from Photos

I've had several requests to post the slides on estimating prototype dimensions on the blog. 
The following images are the slides from the presentation - I hope they are helpful:


Thursday, September 19, 2019

(Somewhat) Weathered Windows

LEFT: Window primed with Tamiya Tan and Hunterline Driftwood wash. RIGHT: Window primed with Hunterline Light Gray. CENTER: After drybrushing white. 
I've long been frustrated at the results I've gotten painting and weathering plastic window castings. I'd find more often than not the walls on my models - even the styrene ones - would look pretty good. However, the plastic window and door castings always looked like fresh and newly painted. That might be acceptable for a well-maintained building, but what if you want things like windows and doors to show the ravages of time? 
The logical approach would be to paint the plastic castings white and then weather them. After all, that's what happens on the prototype. Honestly, for darker windows it's not as much of a problem. But most windows, no matter what the color of the building walls, tend to be white. So the trick becomes weathering a light colored window. 
I tried airbrushing those white windows with some earth tone paint. And I tried washes of India Ink and alcohol, pastel chalks and drybrushing colors such as Raw Umber and Grimy Black. The results always ended up looking like someone had streaked, airbrushed or chalked a dark color onto a white window. And though I took some solace in the fact that my results were consistent, they still looked awful. 

An Experiment
As I was painting the windows for the implement dealer it occurred to me that the solution may be to reverse the "paint final window color then weather" process. 
After removing most of the sprues and gates from the windows, I taped them to a scrap of cardboard on a roll of painter's tape (the Green Frog kind - but the blue tape works just as well!).
Then, instead of reaching for the can of white spray paint, this time I sprayed everything with Tamiya Flat Tan. After that dried, I gave the castings a quick wash of Hunterline stains. I found Light Gray (shown here) and Driftwood seem to produce a pleasing "soft" warm almost-but-not-quite black color. 
After I waiting for the stain to dry completely - more than 48 hours in the case of the doors and windows in these photos - I went over each with a light drybrushed coat of white paint. A little goes a long way here - and I found a light touch is required. I did get acceptable results after a few practice attempts (see lead photo above and the door photo below). 

If you can't tell, I'm quite pleased with the results.